Welcome to our comprehensive guide on web scraping in Python!
If you’ve ever wanted to learn web scraping with Python, you’ve come to the right place.
In this extensive Python tutorial for web scraping, we’ll cover everything you need to know, from the basics to more advanced techniques & we will build a web scraper of our own.
As a beginner, you may find the concept of web scraping a bit intimidating, but worry not! Our easy-to-understand tutorial is designed for learners of all levels, making it the perfect resource for those just starting out or experienced programmers looking to expand their skill set.
Web scraping is a valuable skill in today’s digital age, as it allows you to extract data from websites and use it for various purposes, such as data analysis, research, or even building your own applications. With this Python tutorial for web scraping, you’ll soon be able to navigate through the world of web data with ease.
It is a long post so fasten your seat belts and let’s get started!!
Before we start to build our web scraper with Python, let us understand the importance of headers while scraping any web page. We will explore headers in-depth. You might be afraid of headers or you might get an uncomfortable feeling when you see headers like x hyphen or something.
I might be wrong but when I started coding I was very intimidated by headers. But soon I realized that it is very simple to use headers while making requests.
Why learn web scraping with Python?
Learning web scraping with Python is a skill highly sought after in numerous fields today, such as data science, digital marketing, competitive analysis, and machine learning.
Python, with its simplicity and extensive library support (such as BeautifulSoup, Scrapy, and Selenium), makes web scraping easily approachable even for beginners.
This powerful skill allows you to extract, manipulate, and analyze data from the web, turning unstructured data into structured data ready for insights and decision-making.
By knowing how to automate these processes with Python, you can save considerable time and resources, opening up new opportunities for extracting value from the vast data landscape of the internet.
HTTP Headers
In this section, I am going to cover the concept of headers with some examples. So, let’s jump on it.
You might already know when you make API calls, you transfer a piece of information within that envelope. Let’s say one person is a client and another person is a server and an envelope is getting transferred in the form of API and that is the mode of communication.
The contents inside that envelope are actually the data that is getting transferred from one person to another but you might also know that when such communications happen in real life on the top of the envelope there is also the address to whom this data has to go. But along with that address, there is another address that is used when the letter is not received by the receiver.
This is just an analogy but what I am trying to explain to you is that header also plays a similar kind of role.
Headers are a sort of indication for the metadata of what the response or requests consist of inside. Now, to understand this let me categorize headers for you. So, mainly they can be categorized into four different categories.
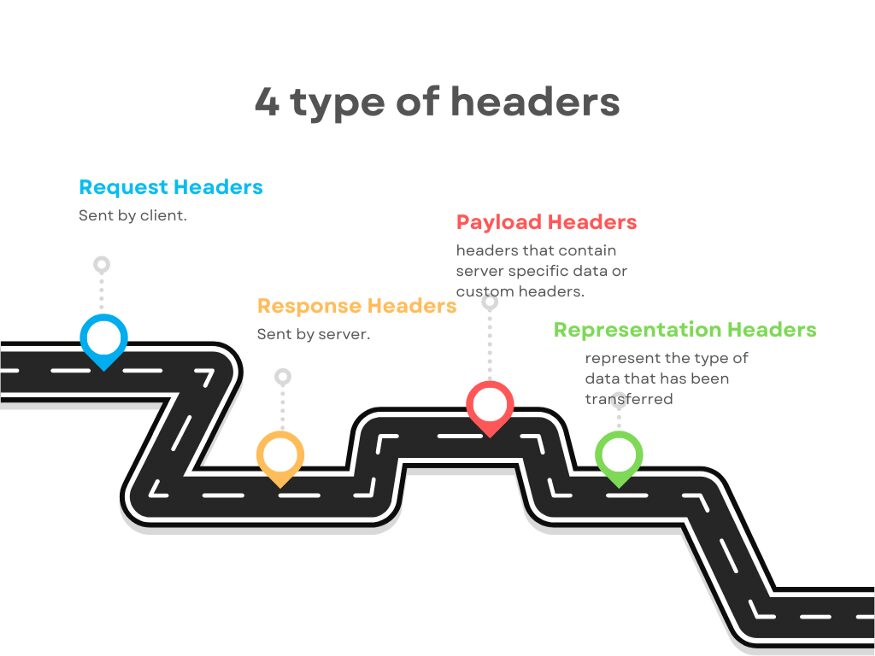
- Request Headers
- Response Headers
- Payload Headers
- Representation Headers
It does not mean that a request header cannot be a response header or vice-versa. Let’s understand what each of these headers actually means.
Request Headers
It is a key value pair just like other headers and they are sent by the client who is requesting the data. It is sent so that the server can understand how it has to send the response. It also helps the server to identify the request sender.
Examples of Request headers are
- Host: www.medium.com
- User-Agent: Mozilla/5.0 (Windows NT 10.0; Win64; x64) AppleWebKit/537.36 (KHTML, like Gecko) Chrome/74.0.3729.169 Safari/537.36
- Referer: https://medium.com
- Connection: close
- Accept-Language: en-us
- Accept-Encoding; gzip
Do remember Content-Type header is not a request header, it is a representation header. We will learn more about this but I just wanted to remove this confusion from your mind as the earliest.
From the list of sample headers shown above, the Host and User-Agent are holding the information that who is sending the request.
Accept-Language tells the server that this is the language in which I can understand your response and similarly Accept-Encoding tells the server that even if you have compressed data I can understand it.
Read More: What Are User-Agents in Web Scraping & How to Use Them Effectively
Response Headers
They are just like request headers but the transmission is in reverse. Actually, these headers are sent by the server to the client. It explains to the client what to do with the response. It provides additional information about the data it has sent.
Example of Response headers:
- Connection: keep-alive
- Date: Mon, 08 Nov 2022
- Server: nginx
- Content-Type: text/html
- Transfer-Encoding: chunked
- Etag: W/”0815”
Etag is the response header that is used for versioning and cache. The Date is telling the client the date at which the response was sent from server to client. But again Content-Type or Content-Encoding are representation headers which we are going to cover in a bit.
Representation Headers
Representation headers represent the type of data that has been transferred. The data that has been sent from the server to the client can be in any format like JSON, HTML, XML, chunked (if the data size is huge), etc. The server also tells the client about the range of the content.
Examples of Representation headers:
- Content-Type: text/html
- Content-Encoding: gzip
- Content-Length: 3523
- Content-Range: bytes 50–1000/*
- Content-Location: /docs/fo.xml
Content-Location tells the client about the alternate location of the resource or the data that is available for the client to retrieve the information. It can be a URL where that particular resource is stored.
Apart from these headers, there can be different headers like Trailer, Transfer-Encoding, Etag, if-Not-Match, Authorizations, etc.
Now, what if you are writing APIs and you want to define your own custom headers? Can you do that? You can absolutely do that. The way in which you define the request and response structure of your API similarly you can implement custom headers that you or the server is going to accept.
An example of a custom header could be the Authorization header. This header can have any value. Further, a server can use the value to identify the client or it can be used for any other logic operations.
Requests
In this section, we are going to learn about python library requests and with the help of this library, we are going to scrape a website. So, why do we need this library and how can we use it?
It is the most popular library downloaded by everyone. It allows us to make an http request to different websites. It opens a socket to the target website and asks them for their permission to connect. This is how multiple applications can talk with each other.
Now, let’s understand how we can use it with a simple web scraping example. We will scrape amazon for this example.
					mkdir scraper
pip install requests
Then create a file scraper.py in this folder and then start coding with me.
					import requests
#This will import the requests library inside our file. Now, we can use it to create a web scraper.

target_url = "https://www.amazon.com/dp/B08WVVBWCN"
headers = {"User-Agent":"Mozilla/5.0 (Windows NT 10.0; Win64; x64) AppleWebKit/537.36 (KHTML, like Gecko) Chrome/105.0.0.0 Safari/537.36"}
resp = requests.get(url, headers=headers).text
print(resp.status_code)
Here we have declared a target_url variable that stores our target URL from amazon.com. Then we declared a header and then finally we made a GET request to our target URL. This is what happens when we run this code.
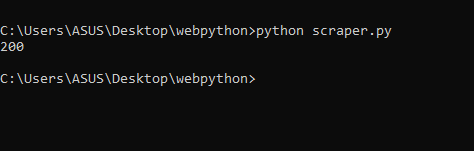
When we print the status we get the status as 200 which means we were able to scrape amazon successfully. You can even print the HTML code we received from amazon by just replacing status_code with text.
print(resp.text)
It will look something like this.
As you can see this data is not readable at all. We need to parse the data out from this junk. For this, we will use BeautifulSoup.
BeautifulSoup
It is also known as BS4. So, it is basically used for pulling data out of any HTML or XML files. It is used for searching and modifying any HTML or XML data.
Now lets us understand how we can use it. We will use HTML data from our last section. But before anything, we have to import it into our file.
from bs4 import BeautifulSoup
From our target page, we will extract a few important data like name, price, and product rating. For extracting data we will need a parse tree.
soup=BeautifulSoup(resp.text, ’html.parser’)
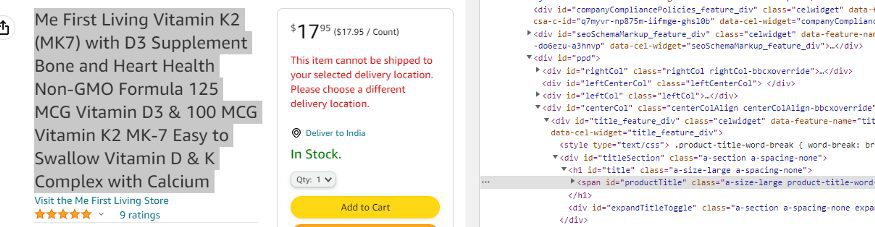
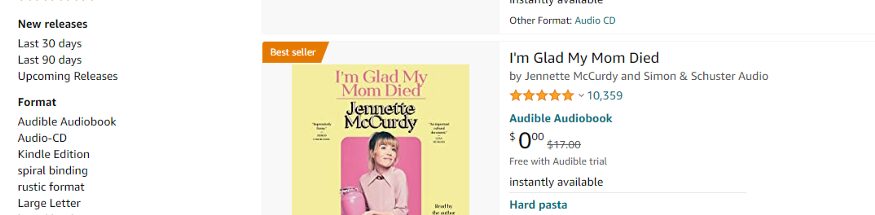
When you inspect the name you will see that it is stored inside a class a-size-large product-title-word-break.
					name = soup.find("span",{"class":"a-size-large product-title-word-break"}).text
print(name)
When we print the name we get this.
As you can see we got the name of the product. Now, we will extract the price.
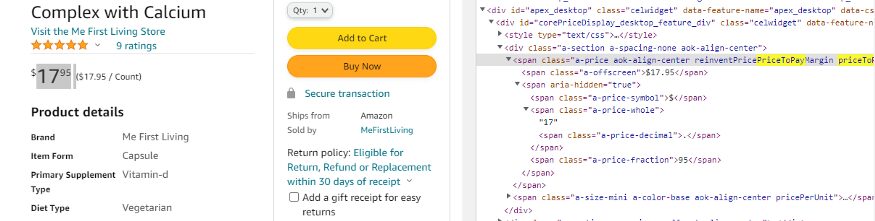
By inspecting the price I can see that the price is stored inside a-offscreen class and this class is stored inside priceToPay class.
					price = soup.find("span",{"class":"priceToPay"}).find("span",{"class":"a-offscreen"}).text
print(price)
When we print it we get this.

Now, the last part is to extract the rating of the product.

As you can see the rating is stored inside a class a-icon-star.
rating = soup.find(“i”,{“class”:”a-icon-star”}).text
So, when we print this we get this.
>>> 4.9 out of 5 stars
But if you just need the 4.9 part and you want to remove all of the extra text then we will use the split function of python.
rating = soup.find(“i”,{“class”:”a-icon-star”}).text.split(“ “)[0]
This will provide us with just the rating part.
>>> 4.9
We were able to parse out all the necessary data from the junk HTML we got in the first section by making a GET request through the requests library.
Now, what if you have to store this data in a CSV file? We will require the Pandas library for this task.
Read More: BeautifulSoup to extract data from HTML
XPath
XPath stands for XML path language which is actually a query language for selecting nodes from an XML document. Now, if you do not know about XML documents then web scraping with XPath covers everything for you.
XML stands for Extensible Markup Language which is a bit like your hypertext markup language which is HTML but there is a very distinct difference between the two. HTML has a predefined set of tags that have a special meaning for example you have a body tag or you have a head tag or a paragraph tag. So, all these tags have a special meaning to your browser, right? But for XML there is no such thing. In fact, you can give any name to your tags and they do not have any special meaning there.
The design goal of XML documents is that they emphasize simplicity, generality, and usability across the internet. That’s why you can use any name for your tags and nowadays XML is generally used for the transfer of data from one web service to another. So, that is another main use of XML.
Coming back to Xpath, well it is a query language for XML documents and the special thing to note here is that it is used for selecting nodes. Now, you might be thinking what are these nodes or this node terminal, right? Well, you can think of any XML document or even any HTML document like a tree.
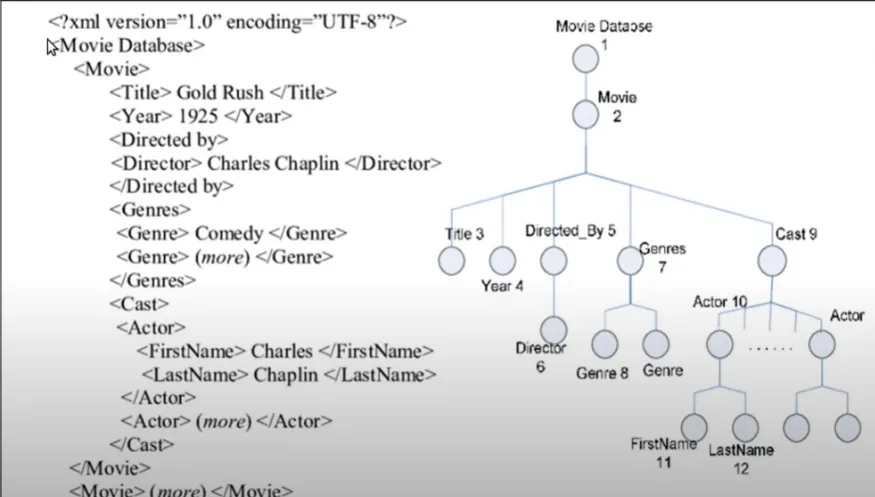
Now, why I am saying that is because if you try to see this particular XML document you have a tag called “Movie Database” in which you have multiple movie tags then in each movie you have a title tag, year tag, directed by tag, and so on.
So, in this way, we are creating a nested structure, and if you try to visualize a tree we can. We have a movie database tag in which we can have multiple movies in each movie we have a title, year, etc. Similarly, in the cast tag we have actors with different tags for first name and last name.
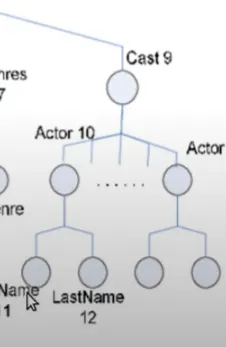
So, this nesting of the tags allows you to visualize the XML or HTML documents like trees. That’s why we have the concept of nodes in the trees. So, all these tag elements are the nodes of your tree. Similarly, HTML can be visualized and then parsed like a tree.
For parsing, we can use libraries like Beautifulsoup. So, HTML documents or XML documents can be visualized like a tree, and XML parts in a text can be used for querying and selecting some particular nodes which follow the pattern specified by the Xpath syntax to select some particular nodes.
This is the concept behind Xpath and now let me show you some examples so that we can understand Xpath syntax a bit.
Example
We are not going to go into much detail about the Xpath syntax itself because in this video our main aim is to learn how to use Xpath for web scraping.
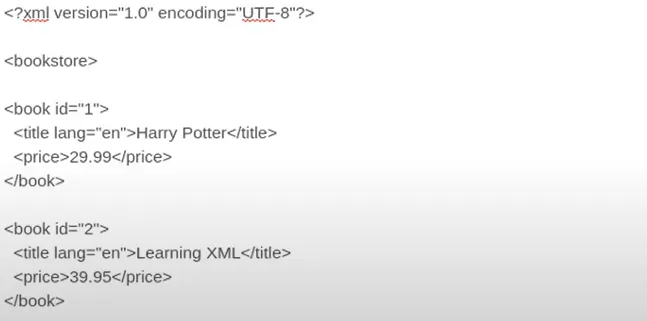
So, let’s say I have an XML document in which this is the code. I have a bookstore tag at the root in which I have multiple book tags and inside that, I have title and price tags.
You can find this Xpath tester on this website. This is where I am testing this XML and Xpath expression.

Now, if I type “/” in that then it means I want to search from the root of your tree and I will write bookstore. So, what it will do is it will search from the root for the bookstore. So, now if I click TEST XPATH I will get this.
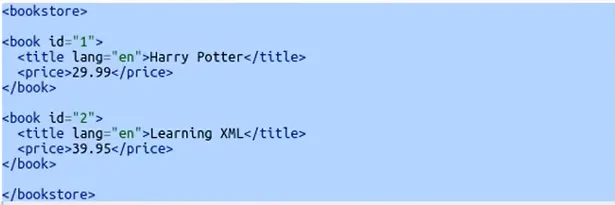
This is the complete bookstore. Now, let’s say in the bookstore I want to get all the books that we have. So, for that, you will do this.

And then I will get this result. I got all the books inside the bookstore.
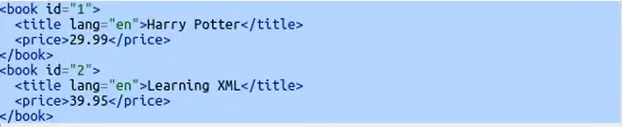
Now, let’s say you want to get only that book whose ID is 2. So, you will just put a square bracket, and inside that, you will pass ‘@id=”2”’.

When you use @ with some attribute then you are referring to a particular attribute inside your book tag in this case and you are saying hey! find all those book tags whose ID is 2. When we run it we get this.

Look at this, we are getting only that book whose ID is 2. Now, let’s say I want to get the price of that book whose ID is 2. For that, I will simply do this.

And in response, I get this.
So, this is how Xpath works. Now, if you want to learn more about Xpath syntax then you can just visit w3schools for more details. Other than that this is all we need to know in order to create a web scraper using it.
LXML
It is a third-party library for working with XML. We have learned enough about XML in the previous section.
LXML provides full XPath support and nice factory functions that make it a better choice. The goal of LXML is to work with XML using the element tree API stored in lxml etree.
LXML can read from files or string objects of XML and parse them into etree elements.
Now, let’s understand how we can use lxml while web scraping. First, create a folder and install this library.
					mkdir scraper
pip install lxml
Once that is done, create a scraper.py file inside your folder scraper and start coding with me.
					from lxml import html
import requests
We have imported the requests library to request because we have to get the HTML data of that web page as well.
url=”https://en.wikipedia.org/wiki/Outline_of_the_Marvel_Cinematic_Universe”
and then we will send an HTTP request to our URL.
url=”https://en.wikipedia.org/wiki/Outline_of_the_Marvel_Cinematic_Universe”
Now, if you will run it you will get 200 code which means we have successfully scraped our target URL.
Now, let’s create a parse tree for our HTML document.
tree = html.fromstring(resp.content)
html.fromstring is a function that takes your HTML content and creates a tree out of it and it will return you the root of that tree. Now, if you print the tree you will get this <Element html at 0x1e18439ff10>.
So, it says we have got HTML elements at some position, and as you know HTML tag is the root of any HTML document.
Now, I want to search certain elements using Xpath. We have already discovered the Xpath earlier in this article. Xpath of our target element is //*[@id=”mw-content-text”]/div[1]/table[2]/tbody/tr[3]/th/i/a
elements = tree.xpath(‘//*[@id=”mw-content-text”]/div[1]/table[2]/tbody/tr[3]/th/i/a’)
We have passed our Xpath inside the tree function. Do remember to use single or triple quotes while pasting your Xpath because python will give you an error for double quotes because our Xpath already has them.
Let’s print and run it and see what happens.
[Element a at 0x1eaed41c220]
On running the code we got our target element which was matched with this particular Xpath.
you will get this <Element a at 0x1eaed41c220>. As you can see it is an anchor tag. We have two options to get the data out of this tag.
- .text will return the text the contains. Like elements[0].text will return Iron Man
- .attrib will return a dictionary {‘href’: ‘/wiki/Iron_Man_(2008_film)’, ‘title’: ‘Iron Man (2008 film)’}. This will provide you with the href tag which is actually the link and that is what we need. We also get the title of the movie.
But since we only need href tag value so we will do this
elements[0].attrib[‘href’]
This will return the target link.
This is what we wanted.
Pandas
Pandas is a Python library that provides flexible data structures and makes our interaction with data very easy. We will use it to save our data in a CSV file.
					obj={}
arr=[]
obj["name"] = soup.find("span",{"class":"a-size-large product-title-word-break"}).text.lstrip()
obj["price"] = soup.find("span",{"class":"priceToPay"}).find("span",{"class":"a-offscreen"}).text
obj["rating"] = soup.find("i",{"class":"a-icon-star"}).text.split(" ")[0]
arr.append(obj)
First, we declared an object and an array. Then we stored all our target data inside this object. Then we pushed this object inside an array. Now, we will create a data frame using pandas with this array, and then using that data frame we will create our CSV file.
					df = pd.DataFrame(arr)
df.to_csv('amazon_data.csv', index=False, encoding='utf-8')
This will create a CSV file by the name amazon_data.csv inside your folder.

Pandas made our job a lot easier. Using this technique you can scrape amazon pages at any scale.
Complete code
					import requests
from bs4 import BeautifulSoup
import pandas as pd
obj={}
arr=[]
url = "https://www.amazon.com/dp/B08WVVBWCN"
headers = {"User-Agent":"Mozilla/5.0 (Windows NT 10.0; Win64; x64) AppleWebKit/537.36 (KHTML, like Gecko) Chrome/105.0.0.0 Safari/537.36"}
resp = requests.get(url, headers=headers)
print(resp.status_code)
soup=BeautifulSoup(resp.text,'html.parser')
obj["name"] = soup.find("span",{"class":"a-size-large product-title-word-break"}).text.lstrip()
obj["price"] = soup.find("span",{"class":"priceToPay"}).find("span",{"class":"a-offscreen"}).text
obj["rating"] = soup.find("i",{"class":"a-icon-star"}).text.split(" ")[0]
arr.append(obj)
df = pd.DataFrame(arr)
df.to_csv('amazon_data.csv', index=False, encoding='utf-8')
print(arr)
Summary
As you saw Requests, BS4, and pandas made our job of extracting data from Amazon a lot easier. Obviously, if you want to scrape millions of Amazon pages with a requests library then you will have to manage many things like proper headers, proxy rotation, and captcha handling.
But but but, if you use Scrapingdog’s Web Scraping API then you won’t have to handle those extra steps at your end. Scrapingdog will use its large pool of proxy and headers to scrape amazon successfully. This data extracting tool is not restricted to just amazon, you can scrape any website even if it requires JS rendering. Scrapingdog is the fastest and the most reliable web scraping API and of course, we provide 1000 free API credits to our new users.
If you want to learn to scrape other websites like Google, yelp, etc using requests and BS4 then read the following articles:
Scrapy
It is a powerful Python framework that is used to extract data from any website in a very flexible manner. It uses Xpath to search and extract data. It is lightweight and very easy for beginners to understand.
Now, to understand how Scrapy works we are going to scrape Amazon with this framework. We are going to scrape the book section of Amazon, more specifically we are going to scrape books that were released in the last 30 days.
I have also written a guide on Web scraping Amazon with Python do check that out.
We will start with creating a folder and installing Scrapy.
					mkdir scraper
pip install scrapy
Now, before we start coding we have to create a project. Just type the below command in your terminal.
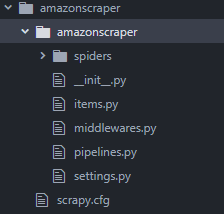
scrapy startproject amazonscraper
This command will create a project folder inside scraper folder by the name amazonscraper.
The above command also returns some messages on the terminal where it is telling you how you can start writing your own scraper. We will use both of these commands.
Let’s go inside this amazonscraper folder first.
					cd amazonscraper
scrapy genspider amazon_spider amazon.com
This will create a general spider for us so that we don’t have to create our own spider by going inside the spider folder, this will automatically create it for us. Then we name the spider and then we type the domain of our target website.
When you press enter you will have a file by the name amazon_spider.py inside your folder. When you open that file you will find that a parse function and an Amazonspider class have been automatically created.
					import scrapy

class AmazonSpiderSpider(scrapy.Spider):
 name = ‘amazon_spider’
 allowed_domains = [‘amazon.com’]
 start_urls = [‘http://amazon.com/']

def parse(self, response):
 pass
We will remove the allowed_domains variable as we do not need that and along with that, we will declare start_urls to our target URL.
					//amazon_spider.py

import scrapy

class AmazonSpiderSpider(scrapy.Spider):
 name = ‘amazon_spider’
 allowed_domains = [‘amazon.com’]
 start_urls = [‘https://www.amazon.com/s?k=books&i=stripbooks-intl-ship&__mk_es_US=%C3%85M%C3%85%C5%BD%C3%95%C3%91&crid=11NL2VKJ00J&sprefix=bo%2Cstripbooks-intl-ship%2C443&ref=nb_sb_noss_2']

def parse(self, response):
 pass
Before we begin with our scraper we need to create some items in our items.py file which are temporary containers. We will scrape the title, price, author, and image link from the Amazon page.
Since we need four items from Amazon we will add four variables for storing the values.
					//items.py

import scrapy

class AmazonscraperItem(scrapy.Item):
 # define the fields for your item here like:
 # name = scrapy.Field()
 product_name = scrapy.Field()
 product_author = scrapy.Field()
 product_price = scrapy.Field()
 product_imagelink = scrapy.Field()
 pass
Now, we will import this file into our amazon_spider.py file.
					//amazon_spider.py

from ..items import AmazonscraperItem
Just type it at the top of the file. Now, inside our parse method, we are going to declare a variable which will be the instance of AmazonscraperItem class.
					def parse(self, response):
 items = AmazonscraperItem()
 pass
We are now ready to scrape our target elements from Amazon. We will start with scraping the product name.
We will declare a variable product_name which will be equal to a CSS selector for the product name element.
					def parse(self, response):
 items = AmazonscraperItem()
 product_name= response.css()
 pass
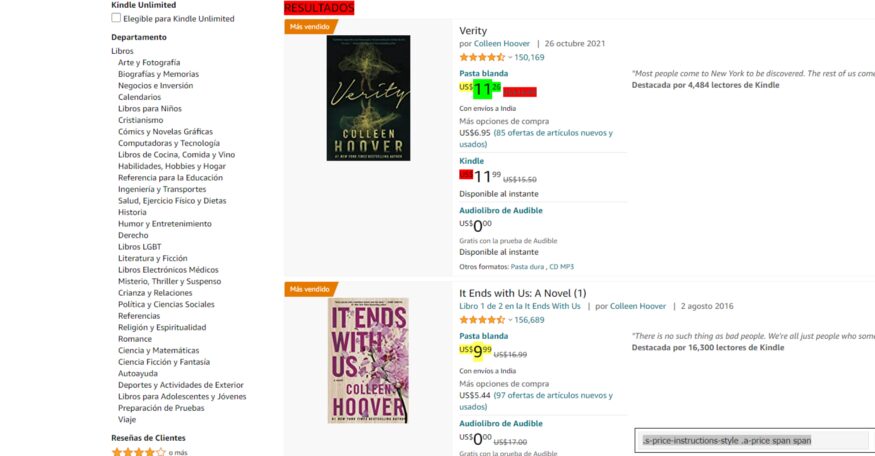
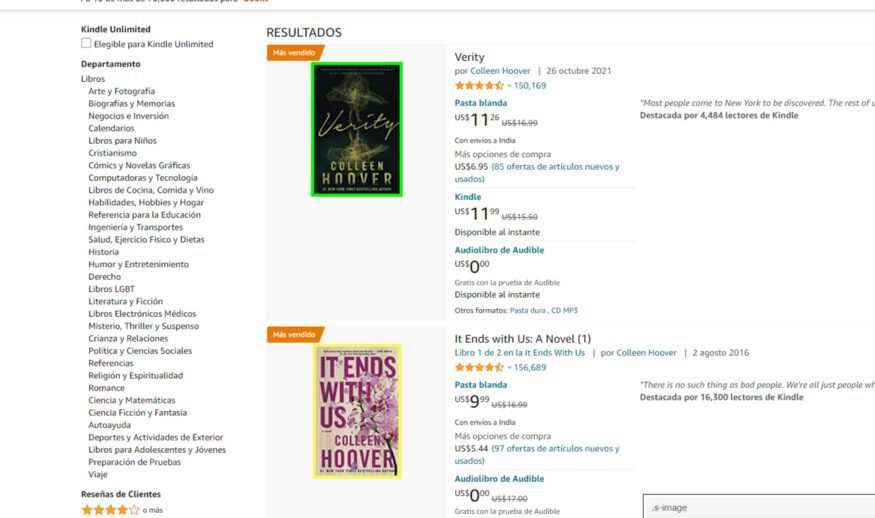
Here I am going to use the SelectorGadget extension to get the element location on the target page.
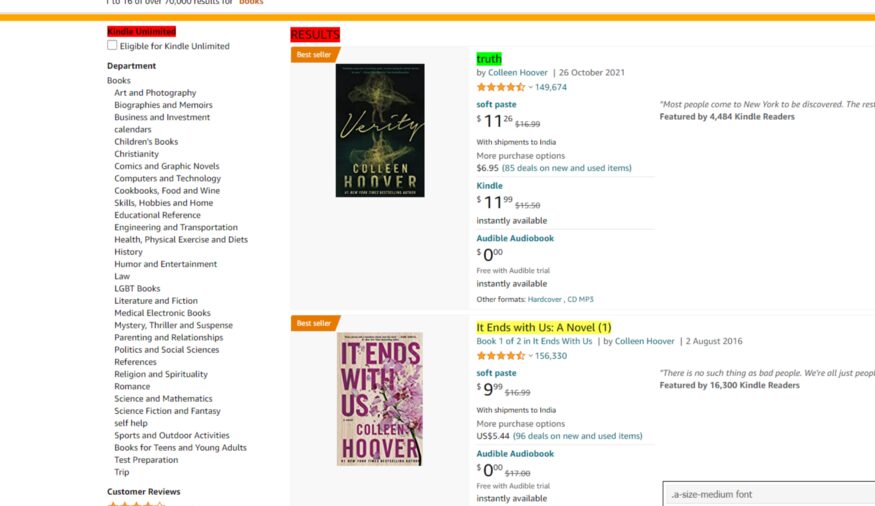
At the bottom right you can see our CSS selector. I am just going to copy it from here and I will paste it into our code.
					def parse(self, response):
 items = AmazonscraperItem()
 product_name= response.css(‘.a-size-medium’).extract()
 pass
I have used the .extract() function to get the HTML part of all those product elements. Similarly, we are going to use the same technique to extract product price, author, and image link.
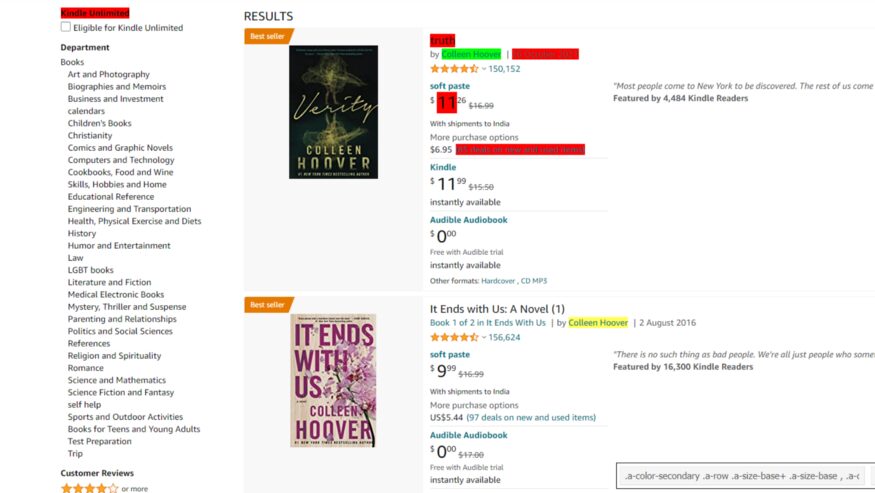
While finding CSS selectors for the author SelectorGadget will select some of them and will leave many authors unselected. So, you have to select those authors as well.
					def parse(self, response):
 items = AmazonscraperItem()
 product_name= response.css(‘.a-size-medium’).extract()

product_author = response.css(‘.a-color-secondary .a-row .a-size-base+ .a-size-base , .a-color-secondary .a-size-base.s-link-style , .a-color-secondary .a-size-base.s-link-style font’).extract()
 pass
Now, let’s find the CSS selector for the price as well.
					def parse(self, response):
 items = AmazonscraperItem()
 product_name= response.css(‘.a-size-medium’).extract()

product_author = response.css(‘.a-color-secondary .a-row .a-size-base+ .a-size-base , .a-color-secondary .a-size-base.s-link-style , .a-color-secondary .a-size-base.s-link-style font’).extract()

product_price = response.css(‘.s-price-instructions-style .a-price-fraction , .s-price-instructions-style .a-price-whole’).extract()

 pass
Finally, now we will find the CSS selector for the image.
.s-image is the CSS selector for our images.
					def parse(self, response):
 items = AmazonscraperItem()
 product_name= response.css(‘.a-size-medium’).extract()

product_author = response.css(‘.a-color-secondary .a-row .a-size-base+ .a-size-base , .a-color-secondary .a-size-base.s-link-style , .a-color-secondary .a-size-base.s-link-style font’).extract()

product_price = response.css(‘.s-price-instructions-style .a-price-fraction , .s-price-instructions-style .a-price-whole’).extract()

 product_imagelink = response.css(‘.s-image’).extract()
Now, as I said earlier this will only provide us with the HTML code and we need to extract the name from it. So, for that, we will use the text feature of Scrapy.
This will make sure that the whole tag does not get extracted and that only the text from this tag gets extracted.
product_name= response.css(‘.a-size-medium::text’).extract()
But because we are using multiple classes for the CSS selector that is why we can’t add this text at the end.
We have to use .css() function for product_price and product_author.
					product_author = response.css(‘.a-color-secondary .a-row .a-size-base+ .a-size-base , .a-color-secondary .a-size-base.s-link-style , .a-color-secondary .a-size-base.s-link-style font’).css(‘::text’).extract()

product_price = response.css(‘.s-price-instructions-style .a-price-fraction , .s-price-instructions-style .a-price-whole’).css(‘::text’).extract()
product_imagelink is just selecting the image so we will not use .css() function on it. Our image is stored inside the src tag and we need its value. 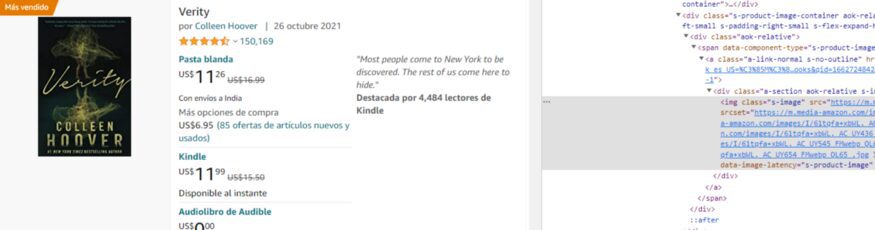
We will use the attr feature of Scrapy.
product_imagelink = response.css(‘.s-image::attr(src)’).extract()
We have managed to extract all the values. Now, we will store them in their individual temporary item containers, and this is how we do it.
items[‘product_name’] = product_name
This product_name is actually the variable that we have declared in our items.py file. We are going to do this with all our other target elements.
					items[‘product_name’] = product_name
 items[‘product_author’] = product_author
 items[‘product_price’] = product_price
 items[‘product_imagelink’] = product_imagelink
Now, we just need to yield the items and this will complete our code. Our code might not at first but let’s see what we have got.
yield items
Now, to run our code run the below command on your terminal.
scrapy crawl amazon_spider
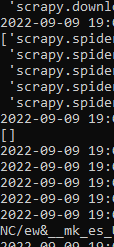
As you can see we got an empty array. This is due to the anti-bot mechanism of amazon. To overcome this we are going to set a User-Agent in our settings.py file.
USER_AGENT = ‘Mozilla/5.0 (Windows NT 6.1; Win64; x64; rv:47.0) Gecko/20100101 Firefox/47.0’
Now, let’s try again.

Hurray!! we got the results. But as usual, this will not work for long as Amazon’s anti-bot technique will kick in and your scraper will stop.
For scraping any number of pages you are advised to use a Web Scraping API.
Complete code
					//amazon_spider.py

import scrapy
from ..items import AmazonscraperItem

class AmazonSpiderSpider(scrapy.Spider):
 name = ‘amazon_spider’
 allowed_domains = [‘amazon.com’]
 start_urls = [‘https://www.amazon.com/s?k=books&i=stripbooks-intl-ship&rh=n:283155,p_n_publication_date:1250226011&dc&language=es&ds=v1:0r+6Zb7Q60+15gaAfSXGzhcbIdyc5r/TuKQVY1NC/ew&__mk_es_US=ÅMÅŽÕÑ&crid=11NL2VKJ00J&qid=1662730061&rnid=1250225011&sprefix=bo,stripbooks-intl-ship,443&ref=sr_nr_p_n_publication_date_1']

def parse(self, response):
 items = AmazonscraperItem()
 product_name= response.css(‘.a-size-medium::text’).extract()
 product_author = response.css(‘.a-color-secondary .a-row .a-size-base+ .a-size-base , .a-color-secondary .a-size-base.s-link-style , .a-color-secondary .a-size-base.s-link-style font’).css(‘::text’).extract()
 product_price = response.css(‘.s-price-instructions-style .a-price-fraction , .s-price-instructions-style .a-price-whole’).css(‘::text’).extract()
 product_imagelink = response.css(‘.s-image::attr(src)’).extract()

items[‘product_name’] = product_name
 items[‘product_author’] = product_author
 items[‘product_price’] = product_price
 items[‘product_imagelink’] = product_imagelink

yield items
and this is our items.py file
					//items.py

import scrapy

class AmazonscraperItem(scrapy.Item):
 # define the fields for your item here like:
 # name = scrapy.Field()
 product_name = scrapy.Field()
 product_author = scrapy.Field()
 product_price = scrapy.Field()
 product_imagelink = scrapy.Field()
 pass
The functionalities of Scrapy do not stop here!!
- You can set a parallel request number in your settings.py file by changing the value of CONCURRENT_REQUESTS. This will help you to check how much load an API can handle.
- It is faster than most of the HTTP libraries provided by Python.
Selenium
Selenium is a framework to test websites and other web applications. It supports multiple programming languages and on top of that, you get support from multiple browsers not just Chrome. It provides APIs to make connections with your driver.
Let’s understand this framework with a simple web scraping task. We are going to scrape a dynamic website with selenium. Our target website will be Walmart. The first step is to install selenium. Type the below command on your terminal to install Selenium.
Also, I have a dedicated article made on scraping walmart product details using Python. Do check that out too! (But, let us focus on this article first)
pip install selenium
Our job would be to open this website and extract the HTML code and print it.
So, the first step is to import all the libraries in our file.
					from selenium import webdriver
from selenium.webdriver.chrome.options import Options
Then we are going to set the options which selenium provides. We will set the page size and we will run it in a headless format.
The reason behind running it in a headless form is to avoid extra usage of GUI resources. Even while using selenium in production on external servers, you are advised to use it with headless mode to avoid wasting CPU resources and reduce throttling risks. This will ultimately increase your cost because you will need to add more servers for load balancing.
					options = Options()
options.headless = True
options.add_argument(“ — window-size=1920,1200”)
Now, we will declare our driver and you have to use the path where your chromium driver is installed.
PATH_TO_DRIVER='YOUR_PATH_TO_CHROIUM_DRIVER'
driver = webdriver.Chrome(options=options, executable_path=PATH_TO_DRIVER)
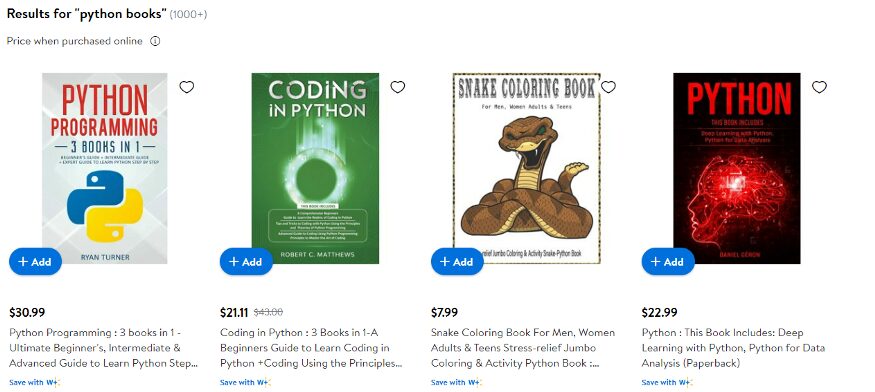
url="https://www.walmart.com/search/?query=python%20books"
We have also declared our target URL. Now, we just need to use it’s .get() method to open the driver.
					driver.get(url)

time.sleep(4)
print(driver.page_source)
I used the sleep method to load the website completely before printing the HTML. I just want to make sure that the website is loaded completely before printing.
While printing we have used page_source property of selenium. This will provide us with the source of the current page. This is what we get when we print the results.
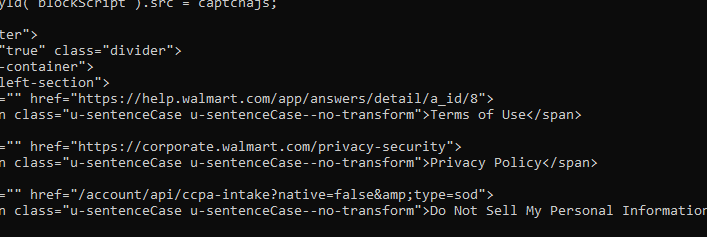
We get the required HTML part. Now, Walmart also has an anti-bot detection method just like amazon but Walmart needs JS rendering also for scraping.
To scrape websites like Walmart you can always use Scrapingdog’s Web Scraping Tool to avoid managing JS rendering and proxy rotation.
I have created a separate blog on web scraping with Selenium here. Do check it out!!
The reason behind using JS rendering for certain websites is:
- To load all the javascript hooks, once all of them are loaded we can easily scrape it at once by just extracting the source after loading it completely on our browser.
- Some websites need lots of AJAX calls to load completely. So, in place of a normal GET HTTP call, we render JS for scraping. To verify whether a website needs a JS rendering or not you can always look at the network tab of that website.
It also provides certain properties which might help you in the future.
- driver.title — This can be used for extracting the title of the page.
- driver.orientation — This will provide the physical orientation of the device with respect to gravity.
Advantages of using Selenium
- The best advantage I found is you can use it with any programming language.
- You can find bugs at an earlier stage of your testing or production.
- It has great community support.
- It supports multiple browsers like Chrome, Mozilla, etc.
- Very handy when it comes to data scraping.
Disadvantages of Using Selenium
- Image comparison is absent in selenium.
- Time-consuming.
- The setup of the test environment is not that easy for beginners.
Regular Expression
Regular expression is a powerful tool to find patterns in text. They are like using Ctrl-F on a word document but much more powerful than them.
This is very helpful when you verify any type of user input and most importantly while scraping the web. The application of Regular expression is very big.
This can be challenging at first but once you are ready, believe me, it will make your job much more efficient.
Its symbols and syntax are universal in all programming languages. To understand regular expression we are going to validate certain strings which you might face while web scraping in Python.
Let’s say you want to scrape emails from the web for the lead generation process of your company. The first part of the email can consist of:
- Uppercase letters [A-Z]
- Lower Case letters [a-z]
- numbers [0–9]
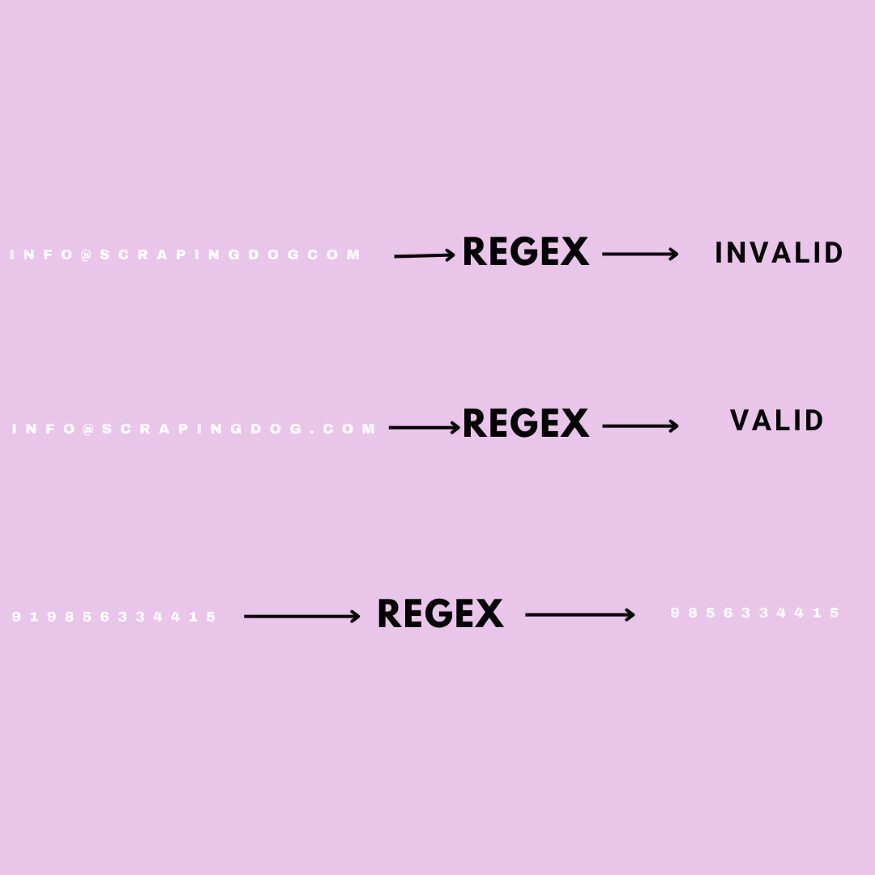
Now, if the email which is scraped does not follow this pattern then we can easily neglect that email and can move on to another email. We will write a simple code in python to identify emails like these and we are going to use re library of python.
					import re
pattern = "[a-zA-Z0–9]+@"
Brackets allow us to specify that we are looking for the characters in a given string such as email. We are going to match the pattern till @ symbol and the plus sign after the bracket means we are looking for any combination of one or more of these characters.
Since emails are provided by many domains then we have to specify that we are looking for one or more upper and lowercase letters.
pattern = “[a-zA-Z0–9]+@[a-zA-Z]”
Now, let’s check whether this can work with an if and else statement.
					email = input()

if(re.search(pattern,email)):
 print(“Valid email”)
else:
 print(“invalid email”)
Run this file on your terminal to check.

Now, let’s try [email protected].

This is how you can identify correct email strings. Now, we will learn how we can replace a character with another one using a regular expression
Replacing String
This can come in handy when you are making changes to a large database where you might have thousands of strings to update.
Now, let’s say we need every phone number entered into a continuous string of numbers with no hyphens but we want to keep the hyphens which are in word form. We will write regular expressions for that.
					import re
pattern = "(\d\d\d)-(\d\d\d)-(\d\d\d\d)"
“\d” will match any single digit. Each set of parenthesis resembles a group.
new_pattern = r"\1\2\3"
So, from left to right we have three different groups. But we need to write what we want this pattern to turn into. Let’s preserve the group but remove the hyphens.
Each backslash number represents a group so our new pattern is concatenating the three groups without the hyphen. We have put r before the string to consider it as the raw string.
Now, let’s take input from the user and check whether it works or not.
					import re

pattern = “(\d\d\d)-(\d\d\d)-(\d\d\d\d)”
new_pattern = r”\1\2\3"

phoneNumber = input()

final_output = re.sub(pattern, new_pattern, phoneNumber)

print(final_output)
This was just a basic example of how regular expression can be used in data scraping with Python. Regular expression works with any language and the rate of response is pretty fast.
You can find tons of material on regular expression online. I found this course very helpful during my Python journey. Also, if you want to test your expression then this website can help you.
Urllib3
Urllib3 is an authentic python library for making HTTP requests to any web address. Now, why it is authentic is because unlike requests it is a built-in part of python. You can use this library if you want to reduce dependencies. This package contains five modules:
- request — It is used to open URLs.
- response — This is used by the request module internally. You will not use it directly.
- error — Provides error classes to request module.
- parse– It breaks URL into schema, host, port, path, etc.
- robotparser– It is used to inspect the robots.txt file for permissions.
Now, we will understand how urllib3 can be used through simple code.
					import urllib3
http = urllib3.PoolManager()
r = http.request(‘GET’, ‘https://www.scrapingdog.com/robots.txt')
print(r.status)

print(r.data)
Steps will look similar to the requests library. PoolManager keeps a track of a number of connections.
Then we send a normal GET request to a robots.txt URL. We can even send POST and DELETE requests with urllib3.
					// POST request

import urllib3
http = urllib3.PoolManager()

r = http.request(‘POST’, ‘http://httpbin.org/post', fields={“Title”: “Scrapingdog”, “Purpose”: “Web Scraping API”, “Feature”: “Fastest Web Scraper”})

print(r.status)

print(r.data)
fields argument will send the data from the client to the server. We are sending a JSON object. The server will send a response to make the confirmation of data added to its database.
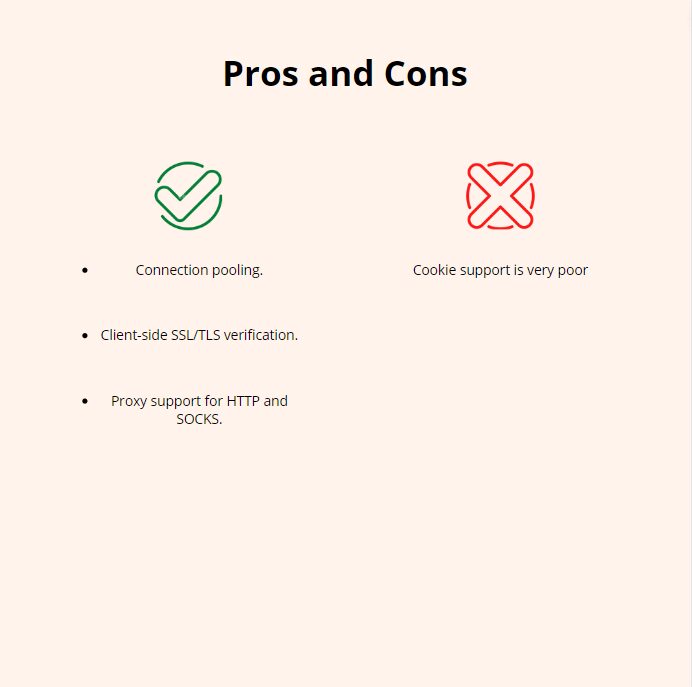
There are very high chances that as a beginner you might not use urllib3 for web scraping. Most probably you are going to use requests. But there are certain advantages of using urllib3 over requests.
For parsing data, you can use BS4 or RegEx.
MechanicalSoup
It is like the child of BS4 because it takes the support of BS4 to mechanize everything. It allows us to do so much more with fewer lines of code. It automates website scraping and on top of that, it can follow redirects and can send and store cookies on its own.
Let’s understand MechanicalSoup a little with some Python code. You need to install it before we begin coding.
					import mechanicalsoup

browser = mechanicalsoup.StatefulBrowser()
browser object will allow us to enter commands without the need of creating new variables. Now, we are going to open the target URL.
					url="https://www.scrapingdog.com"
browser.open(url)
.open() will return an object of type requests. Response, this is due to the fact that Mechanical Soup is using the requests module to make the call. 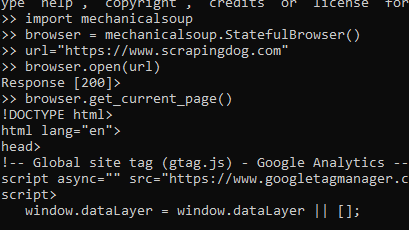
browser.get_current_page() will provide you with the HTML code of the page. It also provides many arguments like .find_all() and .select_form() to search for any element or tag in our HTML data.
Altogether it is a great library to try web scraping a little differently. If you want to learn more about this I would advise you to read this article.
How to handle CAPTCHAs?
Once you start scraping a website at scale, you will start hitting a captcha. That captcha shows that you have been blocked from accessing the website as you were rate-limited. Web scraping with Python is great, but this approach will block your scraper and your data pipeline. You must add some power to your Python script using a Web Scraping API.
Web Scraping APIs like Scrapingdog will help you bypass those limits. Scrapingdog will handle all the hassle of IP rotation to JS rendering on its own. You can start with a free trial by signing up.
Conclusion
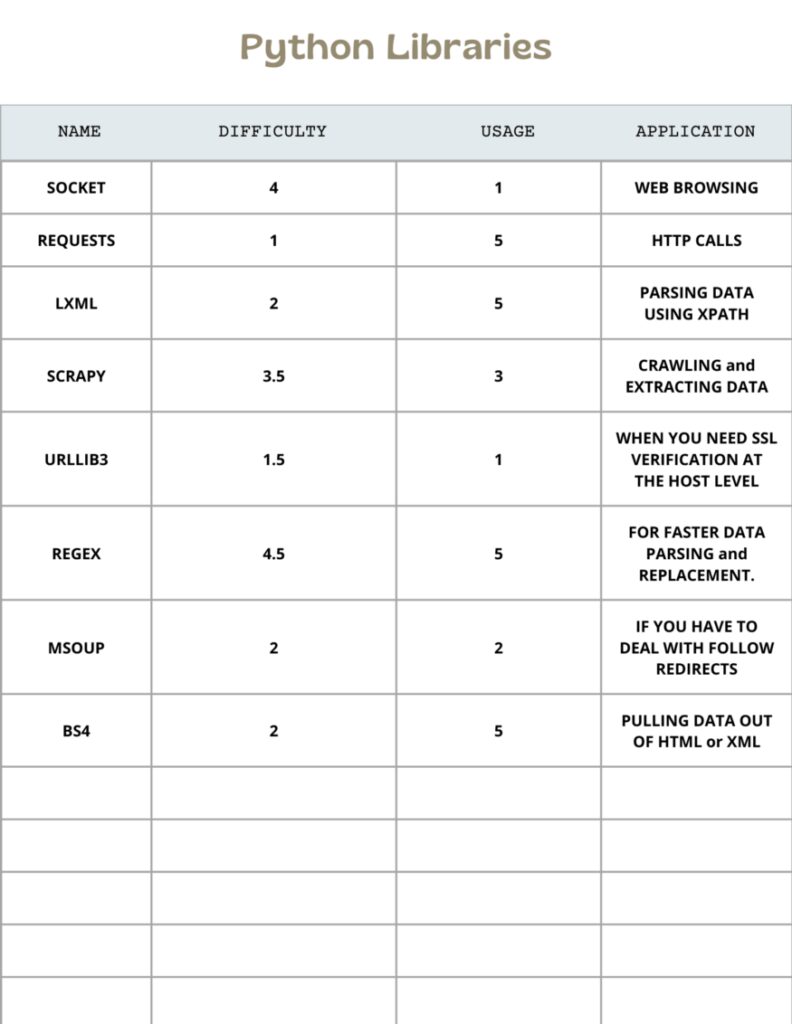
We discussed eight Python libraries that can help you scrape the web. Each library has its own advantage and disadvantage. Some are easy to use but not effective and some of them could be a little difficult to understand but once you have understood them fully it will help you to get things done in no time like RegEx.
I have created a table to give you a brief idea of how all these libraries. I have rated them on the basis of difficulty, usage, and Application. I have given them numbers out of 5 so that you can understand how they can help in web scraping with Python.
I hope you like this blog post, I have tried to mention all the popular Python libraries in this post.
If you think I have left some topics then please do let us know.
Additional Resources
- Scrapy vs Beautifulsoup: Which is better?
- Web Scraping Javascript vs Python
- Detailed Guide on Web Scraping with C sharp
- Automating web scraping with Java
- How to Use Proxy with Python Request
- Functions in Python
- cURL web Scraping
- Web Scraping with R
- cURL web Scraping
- Web Scraping with Rust (Beginner-Friendly Tutorial)
- Complete Tutorial on Web Scraping with Java
- Web Scraping with Nodejs
- Node Unblocker for Web Scraping
Frequently Asked Questions
Python is the common language used in web scraping. It is an all round language and can handle web scraping smoothly. Therefore, python is recommended for web scraping.
No, basic scraping isn’t difficult. However, to scale this process you would need an API.
This tutorial here used all the libraries that are used in python and have extensively explained all of them.
Learning web scraping with python is easy. Also, python is used world wide with ease and hence it is easy to learn web scraping with python.
Beautiful Soup is used for smaller projects while Selenium is used for a little complex projects. Hence, both have different advantages depending where we are using both libraries.
No, you can scrape any data that is available publicly on the web.
Web Scraping with Scrapingdog