TL;DR
- Compares 4 JS HTML parsers for scraping:
Cheerio,htmlparser2,Parse5,DOMParser. - Flow: fetch with
Unirest→ parse book title/price → weigh pros/cons. - Takeaway:
Cheerio= default;Parse5= fast;htmlparser2= robust/streaming;DOMParser= native but memory-heavy. - For scale/reliable fetching, pair parsing with Scrapingdog.
In this article, we are going to look out at different JavaScript HTML Parsing Libraries to parse important data from HTML. Usually, this step is carried out when you write a web scraper for any website, and in the next step, you parse the data.
We are going to test the 4 best HTML parsers in JavaScript. We will look for the advantages and disadvantages of each.
First, we are going to download a page using any HTTP client and then use these libraries to parse the data. At the end of this tutorial, you will be able to make a clear choice for your next web scraping project as to which JavaScript parsing library you can use.
Scraping a Page
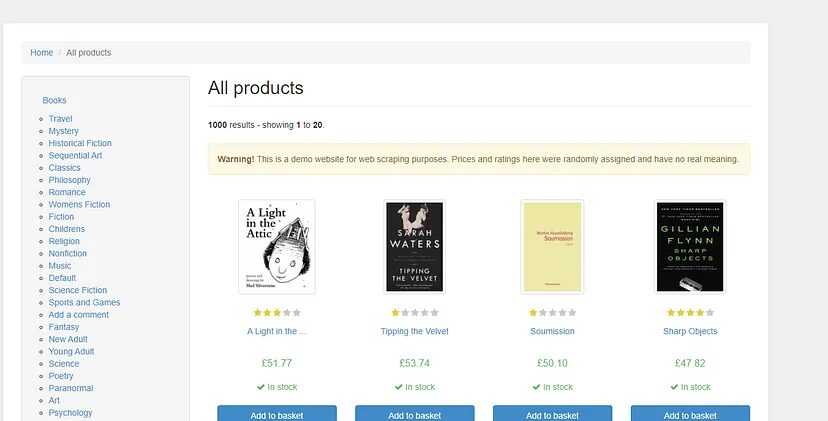
The first step would be to download the HTML code of any website. For this tutorial, we are going to use this page.

Unirest library. Let’s start by installing it in our project.
npm i unirest
Once this is done now we can write the code to download the HTML data. The code is pretty simple and straightforward.
					const unirest = require('unirest');
async function scraper(scraping_url){
  let res;
  try{
    res = await unirest.get(scraping_url)
    return {body:res.body,status:200}
  }catch(err){
    return {body:'Something went wrong',status:400}
  }
}
scraper('https://books.toscrape.com/').then((res) => {
  console.log(res.body)
}).catch((err) => {
  console.log(err)
})
Let me explain this code to you in step by step method.
const unirest = require('unirest');: This line imports theunirestlibrary, which is a simplified HTTP client for making requests to web servers.async function scraper(scraping_url) { ... }: This is anasyncfunction namedscraperthat takes a single parameter,scraping_url, which represents the URL to be scraped.let res;: This initializes a variableresthat will be used to store the response from the HTTP request.try { ... } catch (err) { ... }: This is a try-catch block that wraps the code responsible for making the HTTP request.res = await unirest.get(scraping_url): This line makes an asynchronous HTTP GET request to the specifiedscraping_urlusing theunirestlibrary. Theawaitkeyword is used to wait for the response before proceeding. The response is stored in theresvariable.return {body: res.body, status: 200}: If the HTTP request is successful (no errors are thrown), this line returns an object containing the response body (res.body) and an HTTP status code (status) of 200 (indicating success).return {body: 'Something went wrong', status: 400}: If an error is caught during the HTTP request (inside thecatchblock), this line returns an object with a generic error message ('Something went wrong') and an HTTP status code of 400 (indicating a client error).scraper('https://books.toscrape.com/')...: This line calls thescraperfunction with the URL'https://books.toscrape.com/'and then uses the.then()and.catch()methods to handle the result or any errors..then((res) => { console.log(res.body) }):- If the promise returned by the
scraperfunction is fulfilled (resolved successfully), this callback function will be executed. It logs the response body to the console..catch((err) => { console.log(err) }): If the promise is rejected (an error occurs), this callback function will be executed. It logs the error message to the console.
This is the point where parsing techniques will be used to extract important data from the downloaded data.
JavaScript HTML Parsers
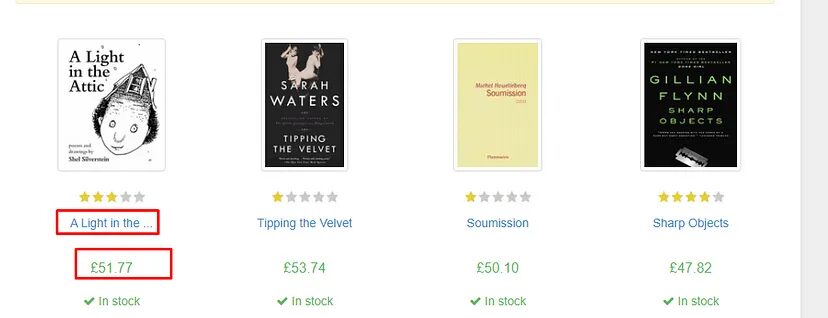
Before parsing, let’s decide what specific elements we aim to extract. Once that’s clear, we’ll process the data using various JavaScript parsing libraries.

We are going to scrape:
- Name of the book
- Price of the book
The JavaScript HTML Parsing Libraries We are Going to Cover in this article:
Cheeriohtmlparser2Parse5DOMParser
Cheerio
Cheerio is by far the most popular library when it comes to HTML parsing in JavaScript. If you are familiar with jquery then it becomes extremely simple to use this library.
Since it is a III party library you have to install it before you start using it.
npm install cheerio
Let’s now parse book titles and their prices using Cheerio.
					async function scraper(scraping_url){
  let res;
  try{
    res = await unirest.get(scraping_url)
    return {body:res.body,status:200}
  }catch(err){
    return {body:'Something went wrong',status:400}
  }
}
scraper('https://books.toscrape.com/').then((res) => {
  const $ = cheerio.load(res.body)
  const books = [];
  $('.product_pod').each((index, element) => {
    const title = $(element).find('h3 > a').attr('title');
    const price = $(element).find('.price_color').text();
    books.push({ title, price });
  });
  console.log(books);
}).catch((err) => {
  console.log(err)
})
This script uses Unirest to perform an HTTP GET request and retrieve the page’s HTML. Cheerio then parses the HTML, selecting book titles and prices via CSS selectors. The extracted data is structured into an array of objects, each containing a book’s title and price. Finally, the script logs the array of books to the console.
You can read web scraping with nodejs to understand how Cheerio can be used for parsing valuable data from the internet.
Advantages
- Running on the backend makes this JavaScript parser notably quicker compared to tools designed for the browser.
- It supports CSS selectors.
- Error handling is quite easy in Cheerio.
Disadvantages
- Developers who are not familiar with jQuery might experience a steep learning curve.
The only downside I faced with Cheerio was my lack of familiarity with jQuery syntax. However, once you get comfortable with it, Cheerio becomes a go-to tool, and you’ll rarely feel the need to switch to another parser.
HTMLparser2
HTMLparser2 is another popular choice by javaScript developers for parsing HTML and XML documents. Also, do not get confused by its name, it’s a totally separate project from htmlparser. It can easily handle invalid or malformed HTML gracefully and parses HTML in a non-blocking, asynchronous way.
This is how you can install it.
npm i htmlparser2
Let’s use this JavaScript library to parse the data.
					const unirest = require('unirest');
const htmlparser = require('htmlparser2');
const url = 'https://books.toscrape.com/';
unirest.get(url).end(response => {
  if (response.error) {
    console.error('Error:', response.error);
    return;
  }
  const books = [];
  let currentBook = {}; // To store the current book being processed
  const parser = new htmlparser.Parser({
    onopentag(name, attributes) {
      if (name === 'h3' && attributes.class === 'product-title') {
        currentBook = {};
      }
      if (name === 'p' && attributes.class === 'price_color') {
        parser._tag = 'price'; // Set a flag for price parsing
      }
    },
    ontext(text) {
      if (parser._tag === 'h3') {
        currentBook.title = text.trim();
      }
      if (parser._tag === 'price') {
        currentBook.price = text.trim();
      }
    },
    onclosetag(name) {
      if (name === 'h3') {
        books.push(currentBook);
        currentBook = {}; // Reset currentBook for the next book
      }
      if (name === 'p') {
        parser._tag = ''; // Reset the price flag
      }
    }
  }, { decodeEntities: true });
  parser.write(response.body);
  parser.end();
  console.log('Books:');
  books.forEach((book, index) => {
    console.log(`${index + 1}. Title: ${book.title}, Price: ${book.price}`);
  });
});
This library might be new for many readers so let me explain the code.
Unirestandhtmlparser2were imported.- Target URL was set for making the HTTP request.
- Created an empty array
booksto store information about each book. We also initialize an empty objectcurrentBookto temporarily store data about the book currently being processed. - We create a new instance of
htmlparser2.Parser, which allows us to define event handlers for different HTML elements encountered during parsing. - When an opening HTML tag is encountered, we check if it’s an
<h3>tag with the class “product-title”. If so, we resetcurrentBookto prepare for storing data about the new book. If it’s a<p>tag with the class “price_color”, we set a flag (parser._tag = 'price') to indicate that we’re currently processing the price. - When text content inside an element is encountered, we check if we’re currently processing an
<h3>tag (indicating the book title) or if we’re processing a price. Depending on the context, we store the text content in the appropriate property ofcurrentBook. - When a closing HTML tag is encountered, we check if it’s an
<h3>tag. If it is, we push the data incurrentBookinto thebooksarray, and then resetcurrentBookto prepare for the next book. If it’s a closing<p>tag, we reset theparser._tagflag to indicate that we’re no longer processing the price. - We use
parser.write(response.body)to start the parsing process using the HTML content from the response. After parsing is complete, we callparser.end()to finalize the process. - Finally, we loop through the
booksarray and print out the extracted book titles and prices.
Advantages
- This JavaScript library can parse large HTML documents without loading them into the memory chunk by chunk.
- It comes with cross-browser compatibility.
- This library allows you to define your own event handlers and logic, making it highly customizable for your parsing needs.
Disadvantages
- It could be a little challenging for someone new to scraping.
- No methods for DOM manipulation.
Parse5
Parse5 works on both backend as well as on browsers. It is extremely fast and can parse both HTML and XML documents with ease. Even documents with HTML5 can be parsed accurately with parse5.
You can even use parse5 with cheerio and jsdom for more complex parsing job.
					const unirest = require('unirest');
const parse5 = require('parse5');
const url = 'http://books.toscrape.com/';
unirest.get(url).end(response => {
  if (response.error) {
    console.error('Error:', response.error);
    return;
  }
  let books = [];
  let document = parse5.parse(response.body);
  function extractBooksInfo(node) {
    if (node.tagName === 'h3' && hasClass(node, 'product-title')) {
      const title = node.childNodes[0].childNodes[0].value.trim();
      const priceNode = node.parentNode.nextElementSibling.nextElementSibling.querySelector('.price_color');
      const price = priceNode.childNodes[0].value.trim();
      books.push({ title, price });
    }
    node.childNodes && node.childNodes.forEach(childNode => extractBooksInfo(childNode));
  }
  function hasClass(node, className) {
    return node.attrs && node.attrs.some(attr => attr.name === 'class' && attr.value.split(' ').includes(className));
  }
  extractBooksInfo(document);
  console.log('Books:');
  books.forEach((book, index) => {
    console.log(`${index + 1}. Title: ${book.title}, Price: ${book.price}`);
  });
});
Advantages
- You can convert a parsed HTML document back to an HTML string. This can help you create new HTML content.
- It is memory efficient because it does not load the entire HTML document at once for parsing.
- It has great community support which makes this library fast and robust.
Disadvantages
- The documentation is very confusing. When you open this page you will find the name of the methods. Now, if you are new you will be lost and might end up finding an alternate library.
DOMParser
This is a native browser parser for both HTML and XML, supported by nearly all modern browsers. JavaScript developers favor it for its speed, reliability, and strong community support.
Let’s write a code to parse the title of the book and the price using DOMParser.
					// Create a new DOMParser instance
const parser = new DOMParser();
const unirest = require('unirest');
async function scraper(scraping_url){
  let res;
  try{
    res = await unirest.get(scraping_url)
    return {body:res.body,status:200}
  }catch(err){
    return {body:'Something went wrong',status:400}
  }
}
scraper('https://books.toscrape.com/').then((res) => {
  console.log(res.body)
  // Sample HTML content (you can fetch this using AJAX or any other method)
  const htmlContent = res.body
  // Parse the HTML content
  const doc = parser.parseFromString(htmlContent, "text/html");
  // Extract book titles and prices
  const bookElements = doc.querySelectorAll(".product_pod");
  const books = [];
  bookElements.forEach((bookElement) => {
    const title = bookElement.querySelector("h3 > a").getAttribute("title");
    const price = bookElement.querySelector(".price_color").textContent;
    books.push({ title, price });
  });
  // Print the extracted book titles and prices
  books.forEach((book, index) => {
    console.log(`Book ${index + 1}:`);
    console.log(`Title: ${book.title}`);
    console.log(`Price: ${book.price}`);
    console.log("----------------------");
  });
}).catch((err) => {
    console.log(err)
})
Advantages
- This JavaScript library has a built-in feature, no need to download any external package for using this.
- You can even create a new DOM using DOMparser. Of course, some major changes would be needed in the code.
- It comes with cross-browser compatibility.
Disadvantages
- If the HTML document is too large then this will consume a lot of memory. This might slow down your server and API performance.
- Error handling is not robust compared to other third-party libraries like Cheerio.
Here’s a concise table summarizing the pros and cons of each JavaScript HTML parsing library mentioned in the article:
| Library | Pros | Cons |
|---|---|---|
| Cheerio | – Fast backend parsing – Supports CSS selectors | – Steep learning curve – No support for JavaScript content |
| htmlparser2 | – Parses large HTML files efficiently – Cross-browser compatible pages | – Challenging for beginners – No DOM manipulation methods |
| parse5 | – Converts HTML back to a string – Memory efficient | – Confusing documentation – Hard for new users |
| DOMParser | – Built-in, no extra package required – Can create a new DOM | – High memory usage – Weak error handling |
Conclusion
There are many options for you to choose from but to be honest, only a few will work when you dig a little deeper. My favorite is Cheerio; I have been using this for about 5 years now.
In this article, I tried to present all the positives and negatives of the top parsing libraries which I am sure will help you figure out the best one.
Of course, there are more than just the libraries mentioned here but I think these four are the best ones.
I would advise you to use a Web Scraper API like Scrapingdog while scraping any website. This API can also be integrated with these libraries very easily.
I hope you like this little tutorial and if you do then please do not forget to share it with your friends and on your social media.

