TL;DR
- Puppeteer + stealth plugin reduces detection (patches UA,
webdriver, plugins, WebGL, timezone). - Install and enable; verify on
bot.sannysoft.combefore/after. - Tune: disable brittle evasions, randomize UA, rotate proxies with custom plugins.
- Limits: not undetectable; fingerprint gaps and overhead; cat-and-mouse.
- Alternatives: Playwright Stealth, Selenium Stealth, Undetectable Chromedriver.
Puppeteer is a powerful JavaScript library that provides high-level control over web browsers and their APIs. Developers can automate virtually any user action, extract data from web elements, and perform complex website interactions, especially for repetitive tasks. It is widely used in web scraping because it allows for the extraction of structured data, even from complex, dynamic websites.
In this article, we will set up the Puppeteer library, enable the stealth mode to avoid detection, and cover other ways in which we can make it undetectable.
Puppeteer
To configure Puppeteer and its plugins, we’ll start with a basic web scraping example. If you already have an existing project, you can skip this section and follow along from the stealth section. Otherwise, we’ll cover the setup in the next section.
We will be running our examples with [email protected] and [email protected], but this tutorial should work with most Node.js versions above 18, which is the recommended runtime for Puppeteer. Some features might work with older runtimes, but we recommend that you always go with the supported environment.
The basic web scraping project we will work on for this blog is an application called “The Basic YouTube Scraper”. We chose this example because it will demonstrate the power of the stealth mode while providing a usable example that might be useful for everyone in the future.
In this article, we will set up the Puppeteer library, enable the stealth mode to avoid detection, and cover other ways in which we can make it undetectable.
Prerequisites
The only prerequisite for this project is to have a valid Node.js installation, a coding editor, and a terminal from which you can run commands. If you don’t have the Node.js runtime, we recommend that you take a look at the official Node.js downloads page or NVM.
Project initialization
1. Verify Node.js environment You should always verify the environment in which you are working, especially when working with NVM. The output node version should be equal to or above 18.
					node --version

v20.15.1
This is the only requirement if you already have a follow-along project. You can skip to the stealth mode section to continue.
2. Initialize the Node.js environment and install dependencies
npm init
You will be asked to fill in some basic information about the app, but you can choose the defaults for this project. After that you should see a package.json file in the root of the directory.
> If it’s not already set, make sure to put “type”: “module” inside of your package.json file as we will be using ES modules in the tutorial.
Now you should install the Puppeteer library/package:
npm install puppeteer
added 97 packages, and audited 98 packages in 5s
7 packages are looking for funding
run `npm fund` for details
found 0 vulnerabilities
Note that the puppeteer package will install the library along with a supported Chrome browser. In most cases, this approach is fine, but if you want to use a custom browser, you should go with puppeteer-core. Everything else in this guide will remain the same.
3. Run the example script
If you haven’t already, you can open the project in your favorite code editor and add a simple index-yt.js file. You can use the provided example project to test out the installation.
In this example, we will navigate to YouTube, search for ‘cat videos,’ and get the top 10 results.
					// Imports the Puppeteer ES Module
import puppeteer from "puppeteer";

// If you are not using ES modules use:
// const puppeteer = require("puppeteer")

// Creates an async function to avoid top-level await
(async () => {
  // Defines the URL and the selectors that will be used to extract the text.
    // Selector will probably change over time which is the reason why we extracted them as constants
  const URL = "https://youtube.com/";
  const SEARCH_INPUT_SELECTOR = "#center > yt-searchbox > div.ytSearchboxComponentInputBox > form > input";
  const SEARCH_BUTTON_SELECTOR = "#center > yt-searchbox > button";
  const YT_VIDEO_CONTAINER_SELECTOR = "#contents > ytd-video-renderer";
  const YT_VIDEO_TITLE_SELECTOR = "#video-title > yt-formatted-string";

  // Sets up the basic browser and page objects
  // Ref: https://pptr.dev/guides/browser-management
  const browser = await puppeteer.launch();
  const page = await browser.newPage();

  // Navigates to the URL and sets the viewport to 1920x1080
  await page.goto(URL);
  await page.setViewport({ height: 1920, width: 1080 });

  // Locates the YouTube search and types in the search query
  await page.waitForSelector(SEARCH_INPUT_SELECTOR); //wait for selector to load.
  await page.type(SEARCH_INPUT_SELECTOR, "cat videos");

  // Clicks the search button.
  await page.waitForSelector(SEARCH_BUTTON_SELECTOR);
  await page.click(SEARCH_BUTTON_SELECTOR);

  // Wait for the selector (video container) to appear
  await page.waitForSelector(YT_VIDEO_CONTAINER_SELECTOR);

  // Screenshots the page
  await page.screenshot({ path: "output/screenshot-index-yt.jpg", fullPage: true });

  // Scrape the results
  const results = await page.$$eval(
      YT_VIDEO_CONTAINER_SELECTOR,
      (elements, titleSelector) => {
          return elements.slice(0, 10).map((element) => {
            const titleElement = element.querySelector(titleSelector);
            return titleElement ? titleElement.textContent.trim() : null;
          });
      },
      YT_VIDEO_TITLE_SELECTOR
  );

  // Print them out
  console.log("Top Cat Videos Titles:");
  results.forEach((title, index) => {
    console.log(`${index + 1}. ${title}`);
  });

  // Close the browser and end the application
  await browser.close();
})();
After you run the application, you should hopefully see the top 10 trending cat videos in the moment:
					> node index-yt.js

1. Best Cat Videos of the Decade
2. Colorful Cats Running Around Animals: Dogs, Rabbits, Cows - Cat Videos - Cat Sounds
3. Life’s Never Boring With These CATS Around! 😹 Funny Cat Video 2025
4. 😹 FUNNIEST Cats Ever | Hilarious Cat Videos
5. Cat TV for Cats to Watch 😺 Cute Chipmunks, Birds, Squirrels 🐿 Nature Fun 4K HDR 60FPS
6. Cat TV for Cats to Watch 😺 Unlimited Birds Chipmunks Squirrels 🐿 8 Hours 4K HDR 60FPS
7. CAT GAMES COMPILATION | ULTIMATE VIDEOS COLLECTION FOR CATS | TV FOR FELINE FRIENDS 😺 4K 8-HOURS
8. Little mao #cat #catvideos #shorts
9. Videos for Cats to Watch - 8 Hour Birds Bonanza - Cat TV Bird Watch
10. CAT GAMES - 🐟 CATCHING FISH 1 HOUR VERSION (VIDEOS FOR CATS TO WATCH)
Stealth mode = on
In web scraping, stealth (or stealthiness) usually refers to the set of techniques and strategies used to minimize the likelihood of a website detecting and blocking your scraping activity. Stealthiness is especially crucial in cases where you want the scraping script to go through multiple websites in parallel, all from the same IP address and browser. Simply said, it’s about making your bot/scraping script behave as much like a regular human user as possible.
The problem
Most websites will, eventually, realize that there is suspicious activity coming from a device and will limit its traffic or access. The detection is usually done through various kinds of analysis on the user’s request and/or behaviors, and the punishment will always be some kind of limiting: rate-limiting for minor suspicions or IP limiting/blacklisting for more serious offenses. Even regular users who casually browse the web can experience these kinds of challenges, which are common examples of bot prevention systems.
Most websites use a combination of techniques, including:
- CAPTCHAs: Requiring users to solve challenges to verify they are human
- Rate Limiting: Restricting the frequency of requests from a single IP address or user agent to prevent bots from overloading the servers
- IP Blocking: Temporary or permanent blocking of IP addresses that are suspicious. Similar to rate limiting but harsher
- User-Agent Analysis: Inspecting the user-agent string in HTTP requests to identify known bot signatures
- Honeypot Traps: Embedding hidden links or elements that are only visible to bots, allowing websites to identify and block them.
These are the most common ways to stop bot traffic, but this isn’t a complete list. Developers are always trying to find new ways to prevent web scraping and bot actions, so what works today might not work tomorrow.
The solution
Luckily, for every person trying to prevent scraping, there’s someone working to find a way around it. Over the years, resources for bypassing these systems have accumulated, making it hard to keep track of what techniques are still effective, what’s new, and how to use them. This is a key reason to consider using external libraries in your project. The maintainers are the kind of people who follow these developments and regularly update the library, so you, as an end user, stay up-to-date. Of course, this doesn’t mean you should rely on only one library. You should always conduct your own research and find the approach that works best for you.
In the following sections, we will describe some of the libraries, methods, and techniques used to bypass bot detection systems.
Puppeteer Stealth Plugin
Puppeteer stealth plugin, or puppeteer-extra-plugin-stealth is a plugin for Puppeteer that aims to make it significantly harder for websites to detect that you’re using an automated browser. It achieves this by patching various browser properties and behaviors that are commonly used for bot detection. This allows developers to mimic human-like browsing patterns more effectively, increasing the success rate of web scraping tasks.
In the following sections, we will describe some of the libraries, methods, and techniques used to bypass bot detection systems.
Key features
The Puppeteer stealth plugin includes many built-in evasion techniques. These techniques and patches, covered later in the usage section, help pass most anti-bot tests. The most valuable ones are:
- User-Agent & Permissions: Provides a real-looking User-Agent string without headless hints (source)
- Navigator Webdriver: Masks navigator.webdriver
- by setting it to false (source)
- Chrome Runtime & Window.chrome: Adds a window.chrome object with expected properties (source)
- Navigator.plugins & Navigator.languages: Fakes common plugins to avoid “empty plugins” detection (source)
- Timezone & Locale: Aligns Intl.DateTimeFormat().resolvedOptions().timeZone with your proxy or location (source)
- WebGL Vendor & Renderer: Patches WebGLRenderingContext to provide realistic GPU details (source)
- Iframe.contentWindow Fixes iframe behavior to mimic how Chrome handles contentWindow (source)
You can learn more about these and other evasion techniques in the official GitHub repository.
In the following sections, we will describe some of the libraries, methods, and techniques used to bypass bot detection systems.
Installation & Initial setup
The installation process for this plugin should be straightforward. You will first need to check if you have the valid Node.js environment set up and if your puppeteer instance is working. After that, go to your console and follow the next steps:
					npm install puppeteer-extra puppeteer-extra-plugin-stealth

added 38 packages, and audited 136 packages in 5s

9 packages are looking for funding
  run `npm fund` for details

found 0 vulnerabilities
Note that you can omit the puppeteer-extra package if you already installed plugins/extras in the past. However, leaving it in the install command won’t cause any harm.
We will now refer back to the test application that we built earlier. Even though our example was working fine, it had a lot of flaws that could scale badly with time. For example, YouTube services would almost certainly block our requests after a much shorter time because our browser configuration was covered with hints that the bot was using to scrape it.
The first step that you need to do is to load the puppeteer instance from the puppeteer-extra package, rather than puppeteer. This replaces the puppeteer instance with a version that supports plugins.

Replaced puppeteer import with puppeteer-extra
After that you will need to add the following lines that import it StealthPlugin and register it to Puppeteer. You need to add these lines before the first puppeteer command call. We recommend that you put it right beneath the import lines.
					import  StealthPlugin  from  "puppeteer-extra-plugin-stealth";
// If you are not using ES modules use:
// const StealthPlugin = require('puppeteer-extra-plugin-stealth')

puppeteer.use(StealthPlugin())
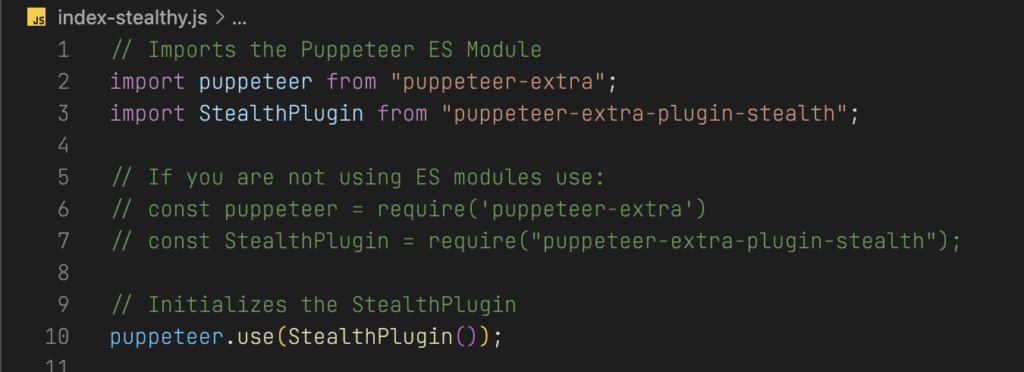
And with that, your application should now be (mostly) capable of simulating normal browser behavior and bypassing certain detection mechanisms.
Usage
The plugin will work almost perfectly out of the box. However, depending on the use case, we can tweak some options to get the most out of it.
Let us first compare the results from before and after we added the plugin. We will use a tool called “anti-bot test”, which is a web tool that displays various information about the browser that is making the request. There is a lot of information that this tool can provide, but we will for now focus on the most basic information. Just remember that green means good, and red means bad. You can click on this link to get the information about your current browser session.
Chart explanation
We will mostly focus on the results in the end Intoli.com tests + additions and the overall colors and info on the Fingerprint Scanner tests. Intoli.com is a website that is focused on research and development related to web scraping, browser automation, and techniques for detecting and bypassing bot detection while referringFingerprint Scanner tests to the “fingerprint” (unique trace) that your browsers leave.
Example result:
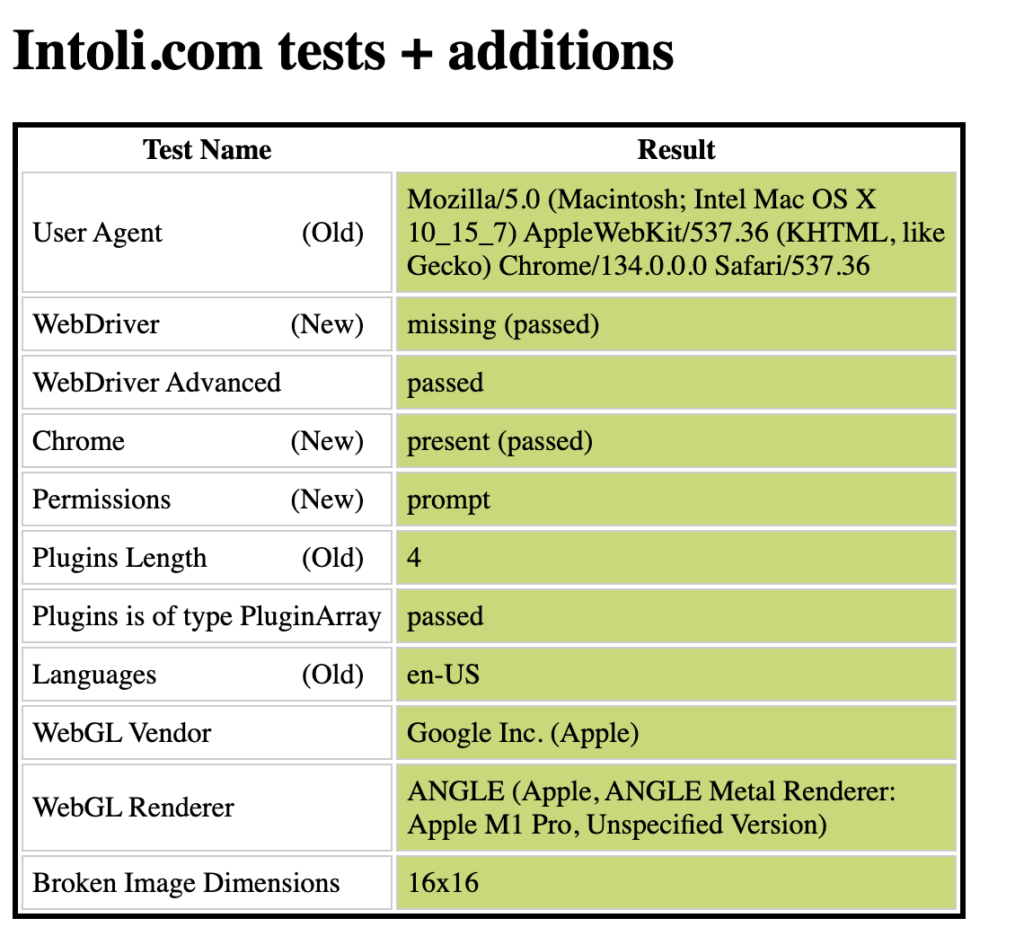
Note that these results were collected from a real browser session.
- User Agent – checks for the user agent string, which identifies the browser and operating system
- WebDriver and WebDriver Advanced – checks if the browser is controlled by WebDriver, an automation tool
- Chrome – checks if the browser identifies as chrome
- Permissions – checks how the browser handles permissions requests (e.g., location, camera)
- Plugins Length – checks the number of browser plugins
- Languages – checks the browser’s language setting
- WebGL Vendor and WebGL Renderer – checks the WebGL vendor, which identifies the graphics card manufacturer
- Broken Image Dimensions – checks the dimensions of a broken image, which can be used for fingerprinting
Fingerprint scanning tests are more complex and out of the scope of this tutorial. If you want to know more about this validation, visit some of the following links:
Test script
You can modify the original script or use this snippet to test out the plugin.
					import puppeteer from "puppeteer";

(async () => {
  const browser = await puppeteer.launch();
  const page = await browser.newPage();

  await page.goto("https://bot.sannysoft.com/");
  await page.setViewport({ height: 1920, width: 1080 });
  await page.screenshot({ path: "output/screenshot-anti-bot-test.jpg", fullPage: true });

  await browser.close();
})();
Before
If we now change our URL to point to this website (or run the snippet) and capture the result as a screenshot, we should see something like this:
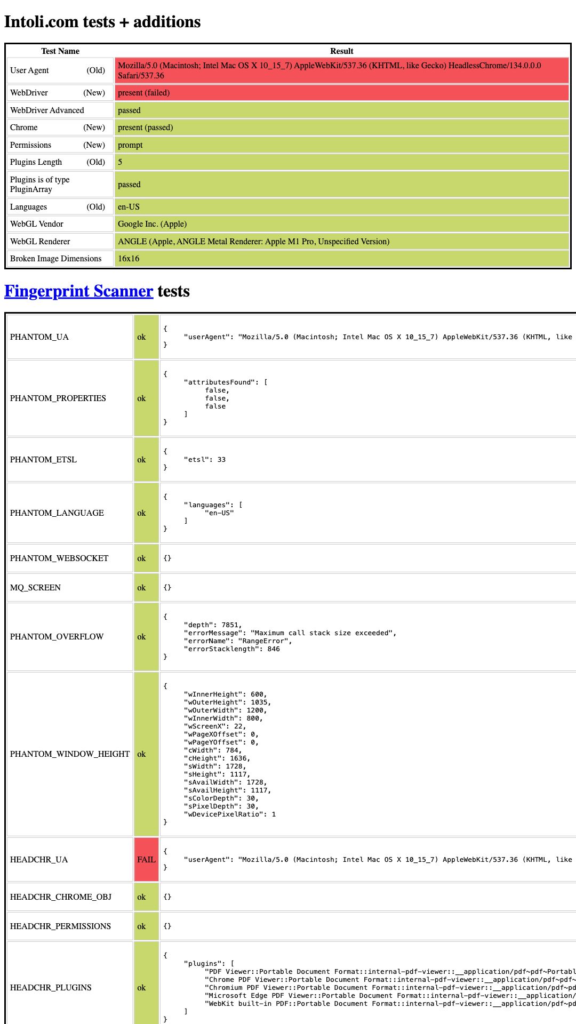
The first issue is that the User Agent header is suspicious. The next issue would be the fact that the WebDriver element is present, which would almost certainly flag our website as a bot. Some of the tests are displayed as passing, but with subsequent requests, some of them might fail.
After
If we do the same in the stealth-enabled script, we should get:
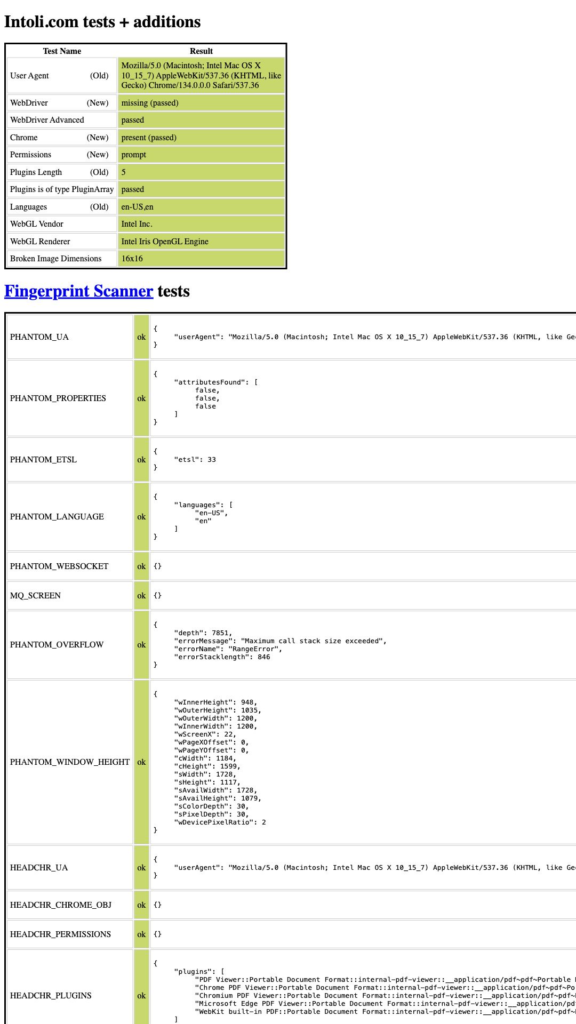
We can now see that these are perfect results! However, scoring perfectly on this test is just one step out of potentially many.
Unloading evasions
All evasion techniques will be loaded by default, which might be overkill for some use cases. If you are sure that you won’t use a specific evasion, or if it’s causing problems, you can unload it with stealth.enabledEvasions.remove.
To demonstrate this, we will provide a simple example:
					import puppeteer from "puppeteer-extra";
import StealthPlugin from "puppeteer-extra-plugin-stealth";

const stealth = StealthPlugin();
puppeteer.use(stealth);

(async () => {
  // Disables the iframe contentWindow patch which might cause iframes to break on some websites
  stealth.enabledEvasions.delete("iframe.contentWindow");

  // Disables the user-agent-override patch and allows us to generate our own
  stealth.enabledEvasions.delete("user-agent-override");

  console.log("✅ Loaded Evasions:");
  console.log([...stealth.enabledEvasions]);

  const unloaded = [...stealth.availableEvasions].filter((evasion) => !stealth.enabledEvasions.has(evasion));

  console.log("\n❌ Unloaded Evasions:");
  console.log(unloaded);

  const browser = await puppeteer.launch();
  const page = await browser.newPage();

  await page.goto("https://bot.sannysoft.com/");
  await page.setViewport({ height: 1920, width: 1080 });
  await page.screenshot({ path: "output/screenshot-anti-bot-custom-evasions-test.jpg", fullPage: true });

  await browser.close();
})();
In this example we unloaded the two most common problematic evasions, the iframe.contentWindow and user-agent-override. The iframe.contentWindow can sometimes break the iframes, which would be a sign that the bot is using the website. The user-agent-override is also removed because we should aim to randomize this value instead of providing the same one every time.
Limitations
Sadly, the Puppeteer stealth plugin is not perfect. It provides a good set of patches that can evade basic detection tests, but since there are many more advanced techniques, it can still be easily detected. For example, a site might simply check for the exact values that Puppeteer stealth is configured to provide and use that to block access. The issues can be summarized as:
- The constant cat-and-mouse game – Previously, this was an argument in favor of using Puppeteer stealth: it actively follows detection developments and patches missing indicators. However, as it updates, detection systems are also monitoring its progress and adapting their methods. This creates an endless cat-and-mouse game
- Incomplete browser fingerprint spoofing – While Puppeteer stealth patches most common indicators, there are still values that can be non-unique or inconsistent, making detection easier
- Performance overhead – Adding patches that increase CPU and memory usage just because they might help isn’t always the best approach. It’s important to evaluate which evasions are truly necessary and find custom solutions for gaps not covered by the plugin
Bonus
Previously, we introduced one of the best and easiest-to-set-up plugins for Puppeteer. We covered its strengths and weaknesses, but what are the alternatives? As mentioned, the art of evading bot detection systems is a constant game of cat and mouse, and you’re always welcome to join the chase!
Custom plugins
User agent randomizer
We previously mentioned that the user-agent-override can sometimes cause problems as it will provide generic and often non-unique values. We can fix this by excluding the puppeteer version and replacing it with our own. You can follow along with your own project, or you can reuse the one that we made earlier; however, we will provide a simple script because it will be easier to demonstrate.
First you should install a package that will do the user agent randomization; we suggest the user-agents plugin, as it’s actively maintained. We will use it to offload the randomization of the user agents.
					npm install user-agents

added 2 packages, and audited 138 packages in 988ms

9 packages are looking for funding
  run `npm fund` for details

found 0 vulnerabilities
After that we will create a JavaScript file for our custom plugin and call it random-useragent-plugin.js. The source code of the plugin:
					import UserAgent from "user-agents";
import { PuppeteerExtraPlugin } from "puppeteer-extra-plugin";

// We will override the PuppeteerExtraPlugin class in order to make it a true Puppeteer plugin
export default class RandomUserAgentPlugin extends PuppeteerExtraPlugin {
    // We will pass the opts to the super class and initialize the UserAgent plugin
    constructor(opts = {}) {
        super(opts);
    }

    // Returns the name for easier identification
    get name() {
        return "random-useragent-plugin";
    }

    // Prints the message before launch so we can verify that it works
    async beforeLaunch(options) {
        console.log(`🚀 Random User-Agent Plugin - browser launching...`);
    }

    // Hook function that will be called after the page is created
    // It will inject a random user agent into the page
    async onPageCreated(page) {
        // We create a new instance which will create the user agent and browser fingerprint
        // Visit: https://www.npmjs.com/package/user-agents for more options
        const userAgent = new UserAgent();

        console.log(`📝 Setting User-Agent for page: ${userAgent.toString()}`);

        await page.setUserAgent(userAgent.toString());
    }
}
You can import/initialize it in the same way that you imported and initialized the stealth plugin. We will provide a small demonstration:
					import puppeteer from "puppeteer-extra";
import StealthPlugin from "puppeteer-extra-plugin-stealth";
// Import it
import RandomUserAgentPlugin from "./random-useragent-plugin.js";

const stealth = StealthPlugin();
puppeteer.use(stealth);

// Load and import the random-user-agent plugin in the same way as we did with stealth
const randomUserAgent = new RandomUserAgentPlugin();
puppeteer.use(randomUserAgent);

(async () => {
    // Disables the user-agent-override patch and allows us to generate our own
    stealth.enabledEvasions.delete("user-agent-override");

    const browser = await puppeteer.launch();
    const page = await browser.newPage();

    await page.goto("https://bot.sannysoft.com/");
    await page.setViewport({ height: 1920, width: 1080 });
    await page.screenshot({ path: "output/screenshot-anti-bot-custom-useragent-test.jpg", fullPage: true });

    await browser.close();
})();
After you run this example, you should see a similar output:
					node test-anti-bot-stealth-random-agent.js

🚀 Random User-Agent Plugin - browser launching...
📝 Setting User-Agent for page: Mozilla/5.0 (Linux; Android 10; K) AppleWebKit/537.36 (KHTML, like Gecko) SamsungBrowser/27.0 Chrome/125.0.0.0 Mobile Safari/537.36
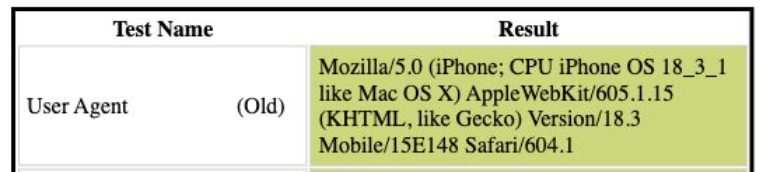
If we now inspect the screenshot, we will see that the user agent is actually set:
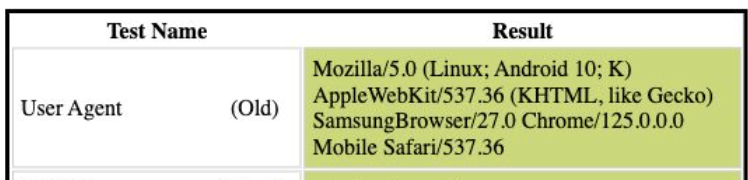
If we run it again we will get a different user agent:
					node test-anti-bot-stealth-random-agent.js

🚀 Random User-Agent Plugin - browser launching...
📝 Setting User-Agent for page: Mozilla/5.0 (iPhone; CPU iPhone OS 18_3_1 like Mac OS X) AppleWebKit/605.1.15 (KHTML, like Gecko) Version/18.3 Mobile/15E148 Safari/604.1
This is just a simple example of what you can do with custom plugins. The key note that you should take away from this example is that you should always adapt to the problem that you are having, rather than always relying on existing tools.
Rotating Proxies
When scraping websites or automating actions using tools like Puppeteer, your IP address becomes your identity on the internet. If you keep making requests from the same IP, especially at high volume or speed, it raises red flags for bot detection systems. That’s where rotating proxies come in. By rotating your proxies, your Puppeteer browser will always launch with a different IP address, making it look like requests are coming from different users or services. This technique helps you bypass IP bans, avoid blocks, bypass rate limits, and even access region-locked content (some websites restrict access based on geographic location).
For the best results, you will need to have a good proxy server list. Sadly, most free options are either not working or unreliable, but they can be just enough for a small scraper. Luckily, the proxy services lists are not too expensive to buy, starting from just a few dollars a month.
Proxy Lists
For this example, we will use 10 proxies from proxyscrape.com’s free proxy list as it provides stable IPs for signed-up customers.
You can see this list of IPs on their website. You can then either copy or download them locally. Make sure to copy the username and password too!

Note that we will only use HTTPS proxies with authentication as they are most reliable free version.
For this plugin, you won’t need to install any additional packages. You can start by creating a new JavaScript file called rotating-proxies-plugin.js:
Note that we will only use HTTPS proxies with authentication as they are most reliable free version.
For this plugin, you won’t need to install any additional packages. You can start by creating a new JavaScript file called rotating-proxies-plugin.js:
					import { PuppeteerExtraPlugin } from "puppeteer-extra-plugin";

// We will overide the PuppeteerExtraPlugin class in order to make it a true Puppeteer plugin
export default class RotatingProxiesPlugin extends PuppeteerExtraPlugin {
    // We will pass the opts to the super class and initialize the UserAgent plugin
    // In this case we also accept the list of proxies
    constructor(opts = {}) {
        super(opts);

        this.proxies = opts.proxies;
        this.username = opts.username;
        this.password = opts.password;

        if (!this.proxies || this.proxies.length === 0) {
            throw Error("Proxies list must be provided!");
        } else if (!this.username || this.username.length === 0) {
            throw Error("Username must be specified!");
        } else if (!this.password || this.password.length === 0) {
            throw Error("Password must be specified!");
        }
    }

    // Returns the name for easier identification
    get name() {
        return "rotating-proxies";
    }

    // Gets a random proxy from the list
    getRandomProxy() {
        if (!this.proxies.length) {
            console.warn("⚠️ No proxies provided!");
            return null;
        }

        const randomIndex = Math.floor(Math.random() * this.proxies.length);
        return this.proxies[randomIndex];
    }

    // Prints the message before launch so we can verify that it works
    async beforeLaunch(options) {
        const proxy = this.getRandomProxy();

        if (proxy) {
            console.log(`🌐 Using proxy: ${proxy}`);
            options.args = options.args || [];
            options.args.push(`--proxy-server=${proxy}`);
        }

        return options;
    }

    async onPageCreated(page) {
        // Authenticates with the proxy before continuing
        await page.authenticate({
            username: this.username,
            password: this.password,
        });
    }
}
Now, we can create a simple example script to demonstrate this in action:
					import puppeteer from "puppeteer-extra";
import StealthPlugin from "puppeteer-extra-plugin-stealth";
// Import it
import RotatingProxiesPlugin from "./rotating-proxies-plugin.js";

const stealth = StealthPlugin();
puppeteer.use(stealth);

// Add your proxy list here
// Please not that this proxy list might not work when you run the script as they often change
// Make sure to replace USERNAME and PASSWORD with your values

const USERNAME = "username";
const PASSWORD = "password";

const DEFAULT_PROXY_LIST = [
           "162.223.90.130:80",
           "20.1,3.148.109:8080"
           "49.67.131.200:1080",
           "27.189.130.64:8089",
           "45.73.0.118:5678",
           "87.248.129.32:80",
           "181.193.12.82:6969",
           "70.166.167.38:57728",
           "69.49.246.33:60876",
           "27.189.129.10:8089",
           "68.71.247.130:4145"
    ];

// Load and import the rotating-proxies plugin in the same way as we did with stealth
// Pass the DEFAULT_PROXY_LIST as opt
const rotatingProxies = new RotatingProxiesPlugin({
    proxies: DEFAULT_PROXY_LIST,
    username: USERNAME,
    password: PASSWORD,
});
puppeteer.use(rotatingProxies);

(async () => {
    const browser = await puppeteer.launch();
    const page = await browser.newPage();

    await page.goto("https://bot.sannysoft.com/");
    await page.setViewport({ height: 1920, width: 1080 });
    await page.screenshot({ path: "screenshot-anti-bot-custom-proxies-test.jpg" });

    await browser.close();
})();
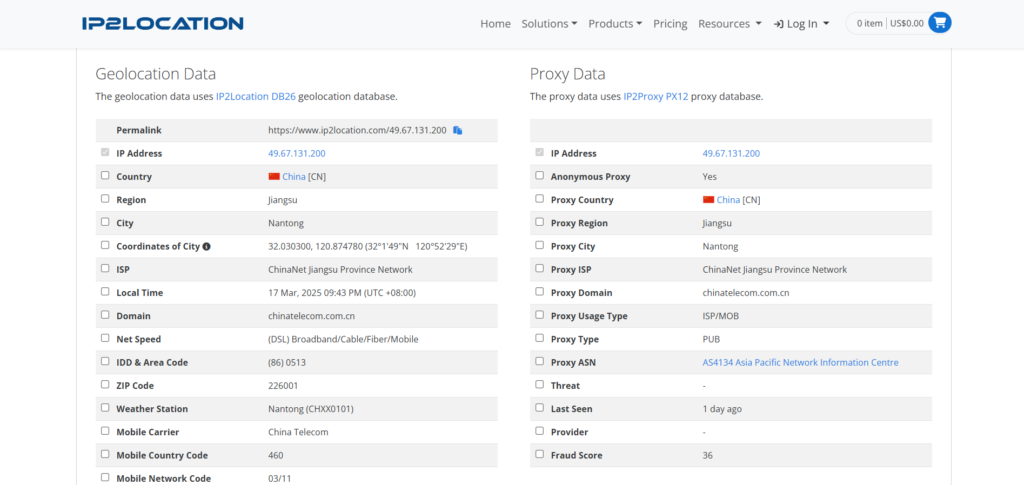
After the first run, we can observe that a proxy server has been picked:
					node test-anti-bot-stealth-rotating-proxy.js

🌐 Using proxy: 49.67.131.200:1080
Note that the script is expected to be slow, as the free proxy services are limited.
If we now take a look at the screenshot, we will see that the request came from China/Nantong which matches the location of the IP in our ProxyScrape dashboard.
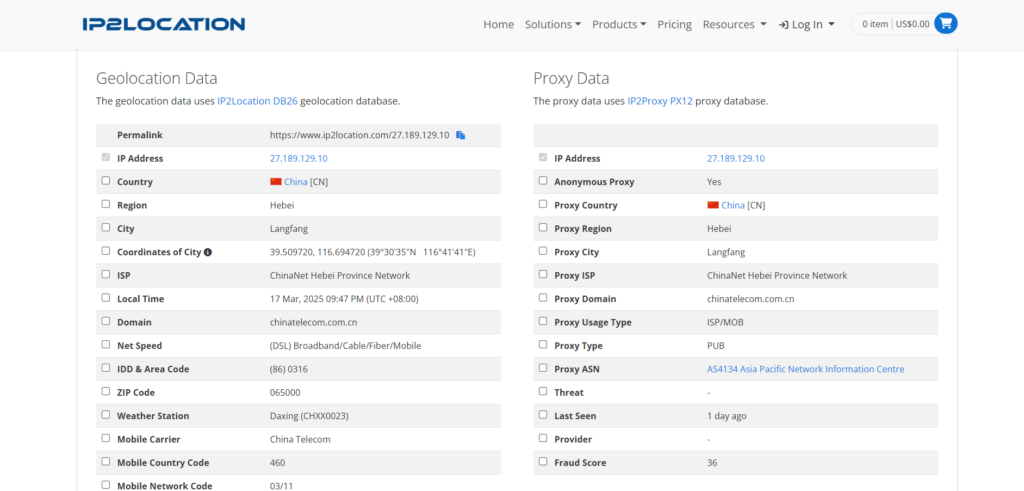
If we run it again we will get:
					node test-anti-bot-stealth-rotating-proxy.js

🌐 Using proxy: 227.189.129.10:8089
which is a result from China/Langfang:
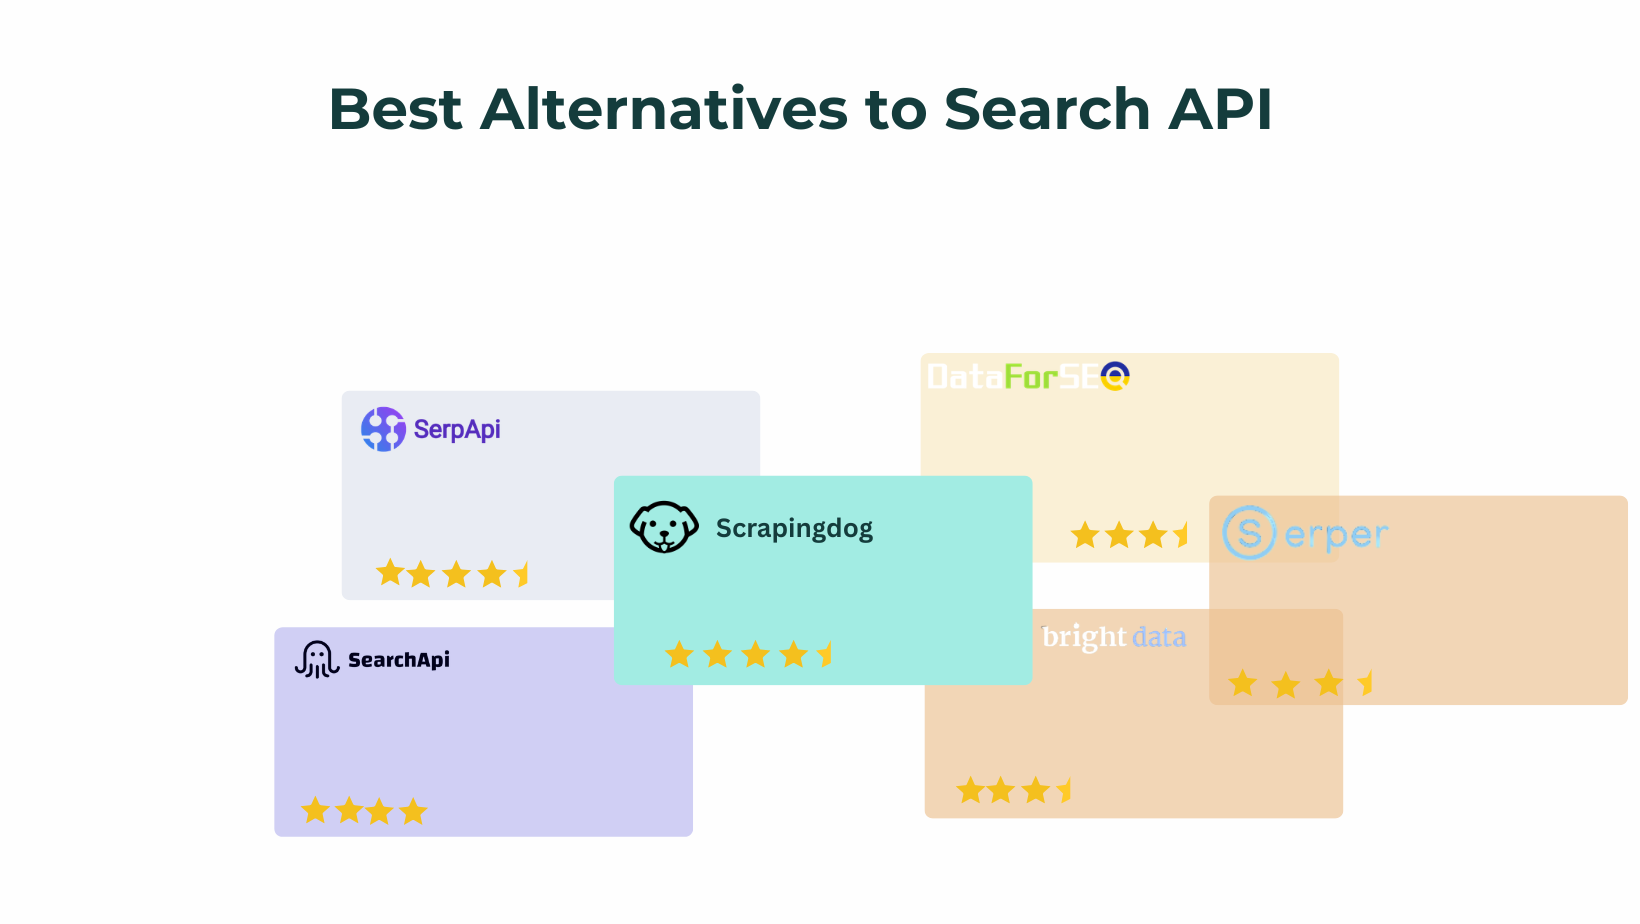
Alternatives
Puppeteer stealth is not the only tool that can be used for stealthy scraping. Popular alternatives are:
– Playwright Stealth – similar evasion package for playwright
– Selenium Stealth – Python library that patches Selenium WebDriver to avoid detection
– Undetectable Chromedriver – Frequently updated ChromeDriver that bypasses bot protection like Cloudflare and Distil Networks
And, of course, many other official plugins that can be used with Puppeteer.